-da0801079a650a2e.jpeg)
17 Year Anniversary Quotes: 110+ Funny, Romantic & Furniture Wishes (2026)
Mar, 12 2026
Your graduation cap is more than just part of your outfit—it’s a canvas to celebrate your journey, personality, and achievements. Decorating your cap allows you to express who you are and make a memorable statement on your big day. In this guide to graduation cap design ideas, you’ll find creative inspiration, themes, and practical tips to help you design a cap that truly reflects your story. From funny and bold statements to heartfelt messages and aesthetic designs, these ideas will help you stand out and celebrate your milestone in style.

Graduation day is a milestone, a moment to celebrate years of hard work, late nights, and countless achievements. While the traditional cap and gown are iconic, decorating your graduation cap offers a unique opportunity to express your individuality. It's a chance to tell your personal story, share a message, or simply add a memorable touch to your big day. This deep dive into designs on graduation caps will help you craft a masterpiece that truly reflects you.
Decorating your graduation cap transforms a standard piece of academic regalia into a personal statement. It's more than just aesthetics; it's a way to stand out in a sea of identical caps, making it easier for family and friends to spot you in the crowd. Beyond visibility, it serves as a powerful symbol of your journey, allowing you to showcase your major, express gratitude, inject humor, or declare your future aspirations. For many, it's a tangible memento, a visual representation of their unique college experience that can be cherished long after the diploma is in hand.
Before you even pick up a glue stick, the absolute first step is to check your specific institution's guidelines regarding decorated graduation caps. This matters significantly because policies vary widely from school to school. Some universities, like the University of Southern California, might have very lenient rules, allowing almost any appropriate decoration, while others, particularly more traditional institutions or those with specific dress codes, might have strict limitations on size, height, materials, or even the themes permitted. For instance, some schools prohibit anything extending more than an inch or two above the cap, or discourage political statements. Ignoring these rules can lead to disappointment, as your beautifully crafted cap might not be allowed during the ceremony itself. Always check the official commencement website or contact the Registrar's office directly to confirm what's permissible.
Crafting impressive designs on graduation caps begins long before any materials are purchased. It starts with a clear vision, transforming a blank slate into a personal emblem. This planning phase is arguably the most critical step, ensuring your final design is both meaningful and manageable.
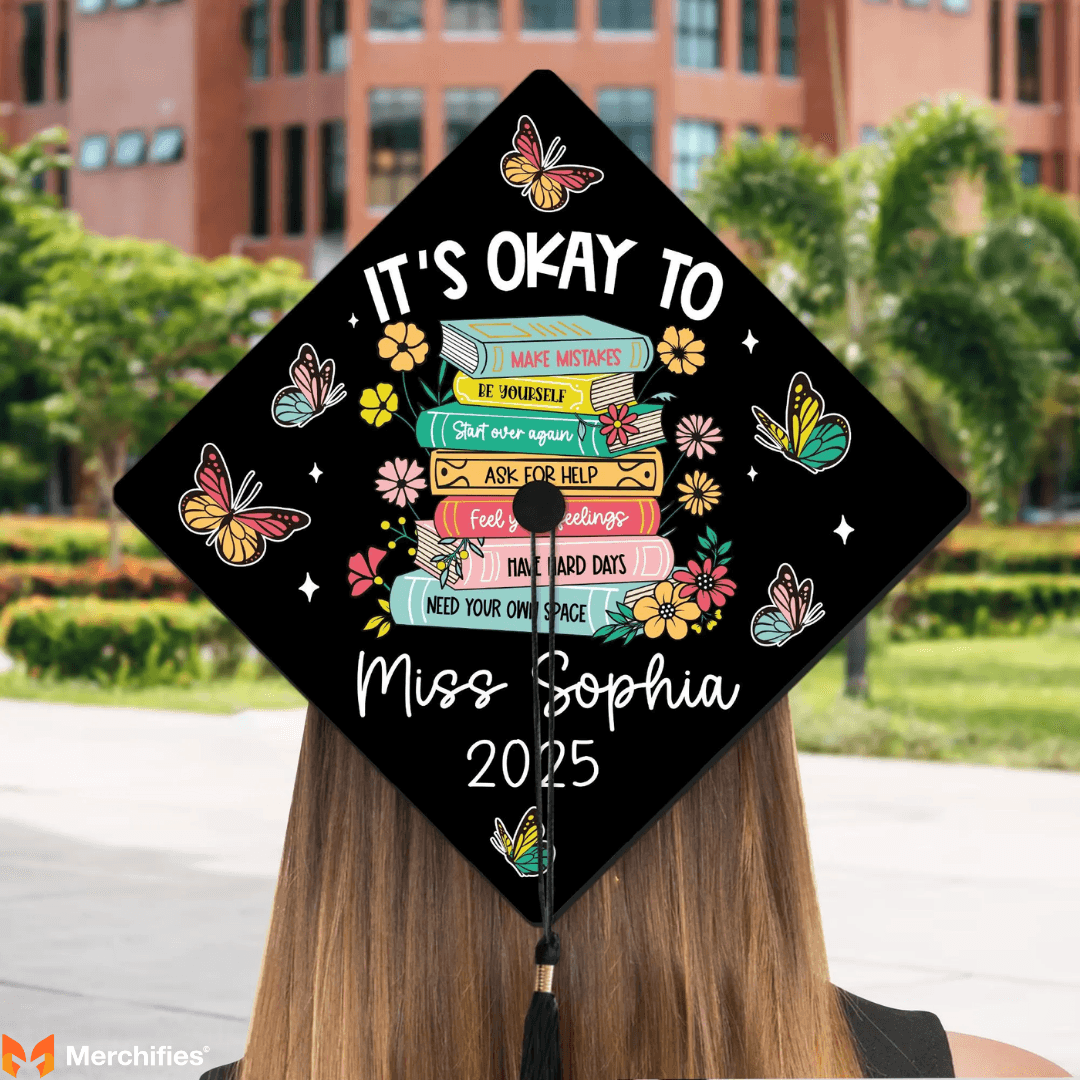
The heart of any great cap design lies in its message. What do you want your cap to say about you? Consider themes like personal achievements, such as "Finally Done: 4 Years, 1000 Coffees, 1 Degree" (a common sentiment among many graduates). Humor is another popular route; I’ve seen caps that hilariously declare "Hire Me, I'm Expensive!" or feature pop culture references that resonate with the graduating class of a specific year, like a "SpongeBob SquarePants" meme from 2024. Gratitude can be deeply moving, with designs thanking parents, professors, or friends – a simple "Thanks Mom & Dad" with a floral border often brings a tear to the eye. Future plans offer a forward-looking perspective, perhaps incorporating a logo for a new job or a symbol representing a dream career, like a stethoscope for a nursing graduate. The best cap idea often comes from something deeply personal to you.
Once you have a theme, think about how it will fit on the cap. Graduation caps are essentially square, but you have a choice: will your design be viewed when the cap is flat on your head, or will it be oriented towards the audience, meaning upside down to you? Most graduates opt for an audience-facing design, which means the top edge of your design will be closest to the tassel button. This matters for text readability and visual impact. Sketching out your layout helps visualize how elements like text, images, and embellishments will be arranged. Will your message be centered, or will it wrap around the tassel? Will there be a large focal image, or a collage of smaller elements?
Precision is key for stunning graduation caps design ideas. Don't just wing it. Start with a rough sketch on paper, drawing a square to represent your cap. This allows you to experiment with placement, font sizes, and color schemes without committing to actual materials. For those with a knack for digital tools, creating a mock-up in software like Canva, Adobe Illustrator, or even PowerPoint can be incredibly helpful. You can import an image of a blank graduation cap and overlay your design elements, playing with different fonts, graphics, and colors. This digital step helps identify potential issues, like text being too small or elements overlapping awkwardly, ensuring your final design translates beautifully from concept to reality.

ALSO READ: 60+ Graduation Gifts: Celebrating Achievements and Future Dreams with Perfect Presents
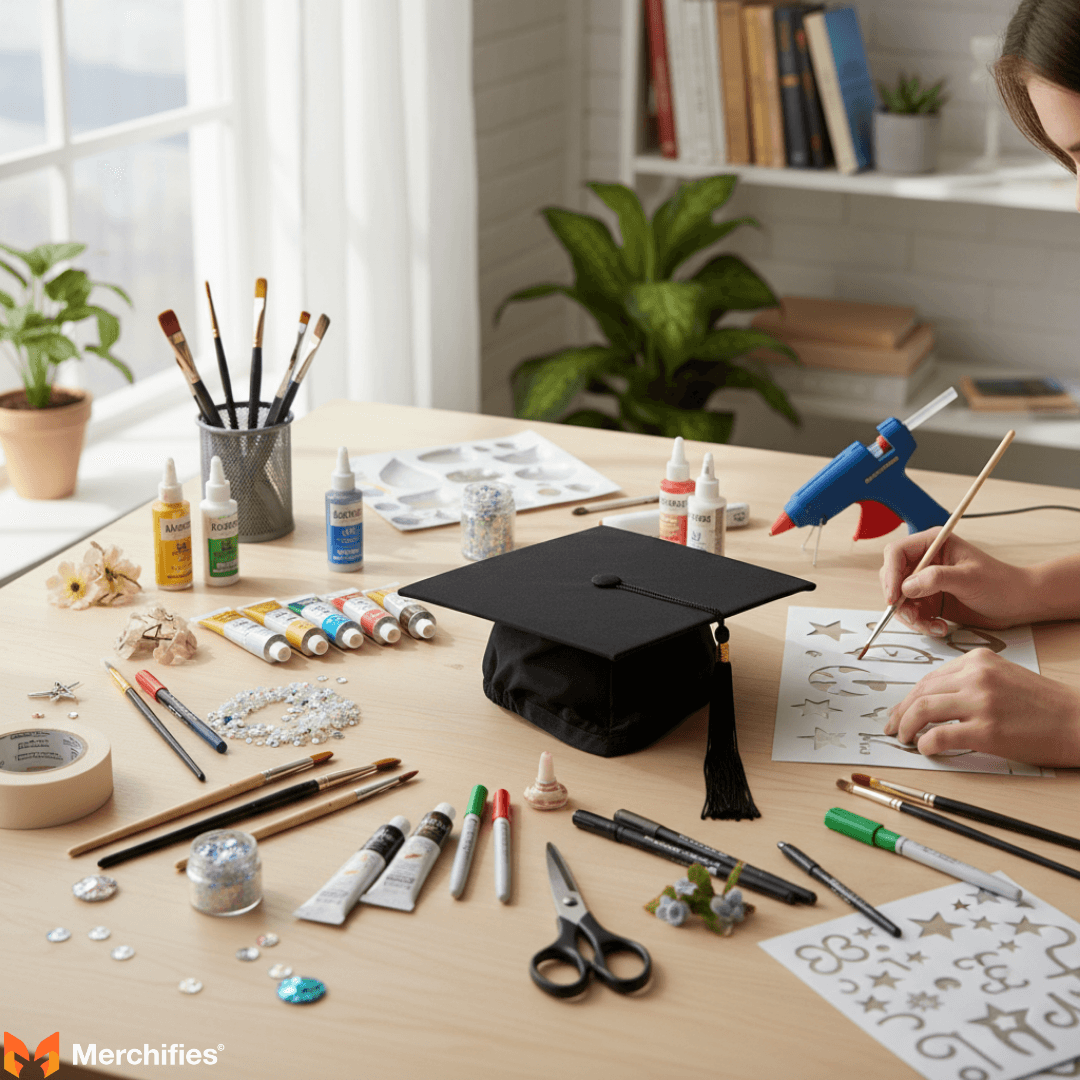
Bringing your vision for designs on graduation caps to life requires the right tools and materials. Quality supplies make all the difference in both the appearance and durability of your finished project. Don't skimp here; a little investment can save a lot of frustration.
The base of your design is often the first thing people see. Common choices include cardstock, poster board, or even fabric. For a vibrant, smooth finish, many crafters opt for a sturdy, colored cardstock that matches their design's background, like a deep navy or a bright teal. Another excellent option is felt, which offers a softer texture and can be easily cut and adhered. For those aiming for detailed hand-painted elements, a thin canvas or even a primed piece of poster board can serve as an ideal surface. In my experience, using a slightly thicker cardstock (65-80lb) prevents warping once adhesives and embellishments are added, especially crucial if you plan to incorporate a lot of layers.
The longevity of your cap design hinges on your choice of adhesive. For general paper or fabric elements, a strong fabric glue (like Aleene's Tacky Glue or E6000) works wonders, providing a flexible yet robust bond. Hot glue guns are fantastic for attaching bulkier 3D elements like artificial flowers or plastic figures, offering an immediate, strong hold. However, use hot glue sparingly and carefully, as it can leave visible strings or create bumps if applied too thickly. For large background pieces, spray adhesive ensures a smooth, even application without wrinkles. Small, flat embellishments like rhinestones benefit from craft glue with a fine tip applicator. Always allow ample drying time for any adhesive to prevent elements from shifting or falling off during the ceremony.
This is where your graduation cap design idea truly comes to life. Glitter, rhinestones, sequins, and pearls add sparkle and texture. Artificial flowers, miniature figures (like tiny books or sports equipment), and even LED lights can create striking 3D effects. Fabric scraps, ribbons, and lace offer opportunities for elegant borders or intricate patterns. For text, consider vinyl lettering, glitter cardstock letters, or even hand-painted calligraphy. The key is to choose elements that complement your theme and won't make the cap excessively heavy or obstruct your view.
Your tool kit can range from basic to advanced. Essential basic tools include sharp scissors, an X-Acto knife for precise cuts, a ruler, and a cutting mat to protect your surfaces. For more intricate cute graduation caps ideas involving detailed lettering or complex shapes, a cutting machine like a Cricut or Silhouette is an absolute game-changer. These machines can precisely cut vinyl, cardstock, felt, and even some fabrics, allowing for professional-looking text and graphics that would be impossible to achieve by hand. For example, a Cricut Explore Air 2 can cut intricate script lettering for a quote like "She believed she could, so she did" in minutes, a task that would take hours and immense patience with an X-Acto knife. While an investment, a cutting machine significantly elevates the quality and complexity of your designs.
Decorating your cap doesn't have to break the bank. For affordable supplies, hit up dollar stores, discount craft sections (like those at Target or Walmart), or clearance bins at larger craft stores like Michaels or Hobby Lobby. Repurposing materials you already have, like old ribbons, fabric scraps, or even buttons, can add a unique, personal touch. For digital elements, utilize free font websites and public domain image libraries. Buying multi-packs of glitter or rhinestones often proves more cost-effective than individual small containers. The smartest move, in my opinion, is to plan your design around what's on sale or what you can creatively reuse, rather than buying everything new.
ALSO READ: Personalized Graduation Gifts: Thoughtful Ideas for Every Graduate
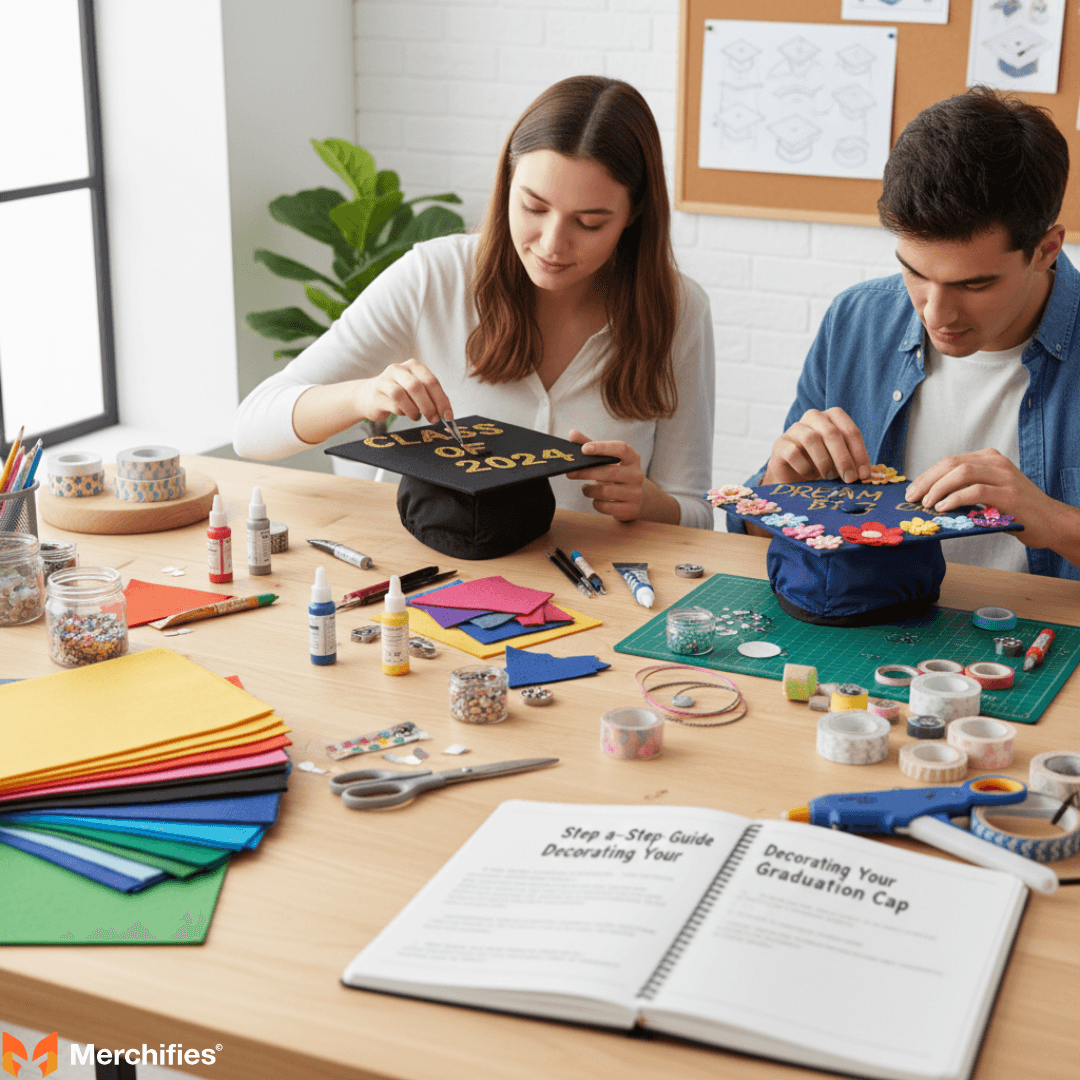
Now that you've planned your design and gathered your materials, it's time to bring your graduation caps inspo to life. This structured approach ensures a smooth process and a stunning final product.
First, ensure your graduation cap is clean and free of dust. If your school provides a cap, it's usually a standard black or dark blue. Many decorators opt to create a separate square panel that can be adhered to the cap, rather than decorating directly on the cap itself. This allows for easier manipulation and less risk of damage to the cap if you make a mistake. Measure the top square of your cap precisely, typically around 9.5 inches by 9.5 inches. Cut your base material (cardstock, felt, etc.) to this exact dimension. Don't forget to mark the center point for the tassel button hole.
With your base material cut, apply your background. This could be a solid color of cardstock, a patterned paper, or a hand-painted design. If using spray adhesive for a large background piece, work in a well-ventilated area and spray both the back of your base material and the cap itself for a stronger bond. Carefully align and press down the base material onto the cap, smoothing out any air bubbles. If you're hand-painting a background, ensure it's fully dry before moving on to the next steps. For example, a popular background for many pictures of decorated graduation caps features a galaxy print, which requires layers of paint to achieve depth; ensure each layer is dry before adding the next.
This is often the focal point of many coolest graduation caps. For text, you have several options
Hand-Lettering: If you have good penmanship, use paint pens, permanent markers, or even acrylic paints with a fine brush. Sketch your text lightly in pencil first.
Stencils: Pre-made stencils offer consistent letterforms. Secure them with painter's tape and dab paint or marker over them.
Cut Vinyl/Cardstock: This is where a Cricut or Silhouette shines. Design your text in the software, cut it out, and then carefully apply it to your cap using transfer tape for vinyl, or craft glue for cardstock letters. For a cap that read "The adventure begins," I've seen vinyl lettering applied with such precision it looked professionally printed.
For graphics, you can print images, cut them out, and glue them on, or use stencils for painted designs. Layering different colors of cardstock can add depth to your graphics.
Now for the fun part – adding dimension! Carefully attach artificial flowers, rhinestones, pearls, or other 3D elements using a strong adhesive like hot glue or E6000. Consider the weight and balance of your cap; too many heavy elements can make it uncomfortable to wear. Ribbons can be used to create bows or borders. LED string lights, powered by a small battery pack hidden on the underside of the cap, can create a dazzling effect, especially for evening ceremonies. One particularly memorable cap I saw for a graduate from the Class of 2023 had tiny, battery-operated fairy lights outlining the phrase "Shine Bright," making it truly stand out.
This is a small but crucial detail. Before permanently adhering your decorated panel to the cap (if you're using a separate panel), make sure the tassel button hole is perfectly aligned. If you're decorating directly on the cap, you'll work around the existing button. If you've created a separate panel, you'll need to cut a small hole in the center, large enough for the tassel's string to pass through and for the button to be exposed. A small X-Acto knife or a paper punch can create a clean, precise hole. This ensures your tassel can be properly attached and swing freely, as it should.
Finding the perfect graduation caps design ideas can be a creative journey. Whether you're aiming for humor, sentimentality, or a professional nod, there’s a design waiting to be discovered. This section provides a wealth of inspiration, covering diverse themes.
Many graduates choose to highlight their academic journey or professional path. A computer science major might feature binary code or a circuit board design, perhaps with the phrase "Code Complete." Nursing graduates frequently incorporate stethoscopes, caduceus symbols, or phrases like "Future Healer." An art history graduate might feature a famous painting or an iconic architectural element. For instance, I once saw a cap with a beautifully rendered molecular structure for a chemistry major, surrounded by the text "The Element of Success." These designs are powerful because they directly connect the celebration to the hard work invested in a specific field.
Gratitude is a powerful emotion to express. Many choose to dedicate their cap to those who supported them. This could be a simple "Thank You, Mom & Dad" adorned with flowers or a family photo collage. Some designs feature the names of siblings or friends who were instrumental in their journey. A particularly touching cap I observed had a small, hand-painted portrait of a grandparent with the words, "This one's for you," a testament to their enduring influence. These designs are often among the most heartfelt and memorable because they acknowledge the community behind the individual achievement.
Humor is an excellent way to stand out and lighten the mood. Witty sayings like "I'm So Glad This Is Over," "Finally Done Adulting," or "Future Trophy Wife/Husband" are always popular. Pop culture references can also be hilarious, such as a "Harry Potter" themed cap declaring "Mischief Managed" or a "Parks and Recreation" cap with Leslie Knope's face saying, "I am a Goddess, a Glorious Female Warrior!" The key to truly effective humorous cap idea is often its relatability to the shared experience of college life, like the ubiquitous "Worth the Hype" cap that became popular in 2022. I've found the most successful humorous designs are those that are clever without being offensive, striking a balance between personal inside jokes and broader appeal.
For the avid fan, a cap is a canvas for their favorite movies, TV shows, books, or video games. "Star Wars" fans might opt for "The Force Is Strong With This One" alongside a lightsaber design. "Friends" enthusiasts could feature the iconic Central Perk couch with "The One Where I Graduate." Gamers might showcase a favorite character or a level-up graphic. For example, a graduate in 2023 had a cap featuring a Pokémon trainer and the phrase "I Choose You, Future!" which was a clever nod to their fandom while looking forward. These designs often resonate deeply with fellow fans and provide an immediate point of connection.
Not every cap needs to be covered in glitter and 3D elements. Sometimes, the most striking graduation cap design idea is one that embraces simplicity. Elegant script lettering with a single, tasteful embellishment, like a pearl border or a delicate floral sprig, can be incredibly impactful. A monochrome design, perhaps black text on a white background with a subtle metallic accent, exudes sophistication. Think clean lines, understated colors, and a focus on beautiful typography. These minimalist designs often stand out precisely because they don't try too hard, letting the message and aesthetic speak for themselves.
For the truly creative, the cap can become a work of art. 3D elements can create incredible depth; I've seen caps with miniature buildings representing a campus skyline or intricate paper flowers blooming across the surface. Mixed media designs combine different materials, like fabric, paint, and found objects, to create rich textures. Hand-painted murals, featuring landscapes, abstract patterns, or detailed portraits, turn the cap into a wearable masterpiece. One graduate studying fine arts once created a cap that was a miniature, hand-painted replica of a famous Van Gogh piece, "The Starry Night," making it a truly unique expression of their passion and skill. These are often the most labor-intensive but yield the most breathtaking results.

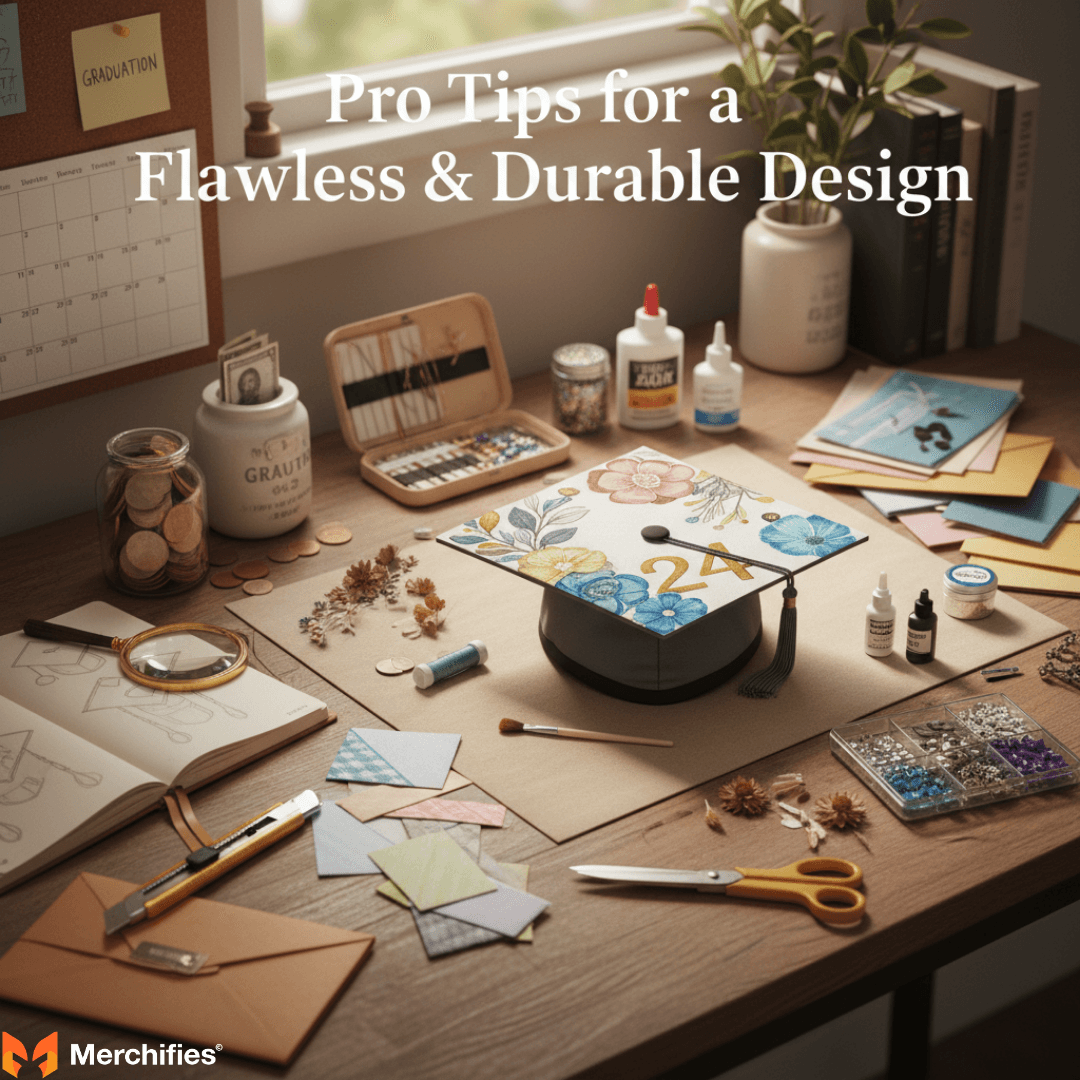
Creating beautiful designs on graduation caps is only half the battle; ensuring they last through the ceremony and beyond requires some strategic thinking. These pro tips will help you avoid common pitfalls and ensure your cap looks perfect on the big day.
The last thing you want is for elements to fall off during the ceremony. To prevent this, always use strong, appropriate adhesives for your materials. For paper or fabric elements, fabric glue or E6000 is far superior to standard craft glue. When attaching heavier 3D items, use hot glue but ensure the bond is solid and doesn't rely on a single tiny dab. For glitter, apply a generous layer of Mod Podge or spray adhesive, then sprinkle glitter, and once dry, seal it with a clear spray sealant (like Mod Podge Acrylic Sealer). This locks the glitter in place, preventing unsightly shedding. My personal rule of thumb is to let everything cure for at least 24 hours before handling the cap extensively, especially if using liquid glues.
Even experienced crafters make mistakes. If your text is crooked, carefully peel off vinyl letters (if they're fresh) or cover cardstock letters with a new base layer. For paint smudges, use a small, damp cotton swab for fresh paint or carefully scrape off dried paint with an X-Acto knife if the base material is sturdy. If you've made a mistake on your base layer, don't despair; sometimes adding a decorative border or a small embellishment can cleverly hide imperfections. One common mistake is overcrowding the cap; if your design feels too busy, try removing a few elements. Less is often more, letting your primary message shine.
Intricate cute decorated graduation caps demand time, often more than you anticipate. Simple designs might take 1-2 hours, but complex, multi-layered designs with hand-lettering, 3D elements, and drying times can easily consume 6-10 hours, spread over several days. Start planning your cap at least 2-3 weeks before graduation. This allows for brainstorming, gathering supplies, executing the design in stages, and ample drying time between layers. Rushing the process often leads to sloppy work, smudged paint, or poorly adhered elements. Consider working on different sections of your design separately (e.g., cutting all your letters, then painting your background) before assembling.
On graduation day, you'll be outside, under bright lights, and in crowds. To avoid glare that makes your design unreadable in photos, consider a matte or semi-gloss finish for any painted or sealed areas. Excessive glitter can also cause glare, so a sealant helps tone it down slightly. For added protection against light rain or accidental bumps, a final light coat of clear acrylic sealant spray can be beneficial, especially for delicate paper elements or fabric. Make sure any 3D elements are firmly attached and not so tall that they interfere with your line of sight or become a hazard in crowded areas. For example, a cap with a towering replica of the "Eiffel Tower" might look amazing but could be cumbersome in a packed auditorium.
Your decorated graduation cap is more than just an accessory; it's a tangible memory of a significant life event. Preserving it correctly ensures you can cherish your unique creation for years to come. This is especially true for those intricate designs on graduation caps that took hours to perfect.
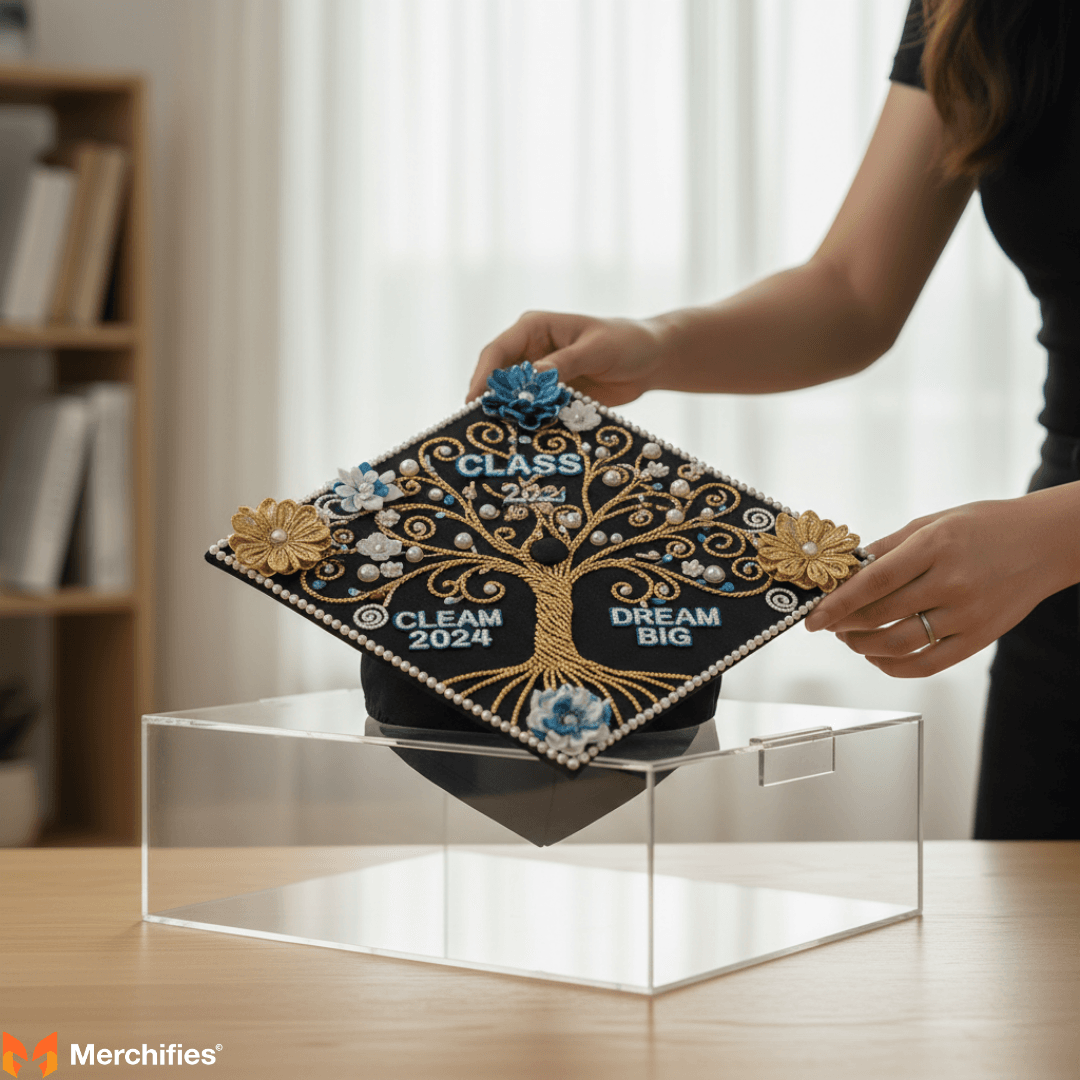
A shadow box is an ideal way to display your decorated cap. These deep frames allow you to secure the cap in place, protecting it from dust and damage while showcasing its 3D elements. You can arrange it with other graduation memorabilia, such as your tassel, a program from the ceremony, a photo, or even your commencement tickets. For a graduate from the Class of 2020, whose ceremony was virtual, a shadow box became an even more important physical representation of their achievement. Alternatively, if your design is relatively flat, you can carefully remove the decorated panel from the cap and frame it like a piece of art, perhaps alongside your diploma.
If a shadow box isn't an option, or if you need to store it before displaying, proper storage is crucial. Ensure your cap is completely dry before packing it away to prevent mold or mildew. Wrap it gently in acid-free tissue paper to protect delicate embellishments and prevent colors from fading or transferring. Store it in a sturdy, breathable box (like an archival storage box) in a cool, dry place away from direct sunlight and extreme temperature fluctuations. Avoid plastic containers that can trap moisture, which is detrimental to paper and fabric. This careful approach ensures that even years down the line, your graduation cap design ideas remain as vibrant and intact as the day you wore them.
Your graduation cap is more than just a piece of academic attire; it's a canvas for your story, your gratitude, your humor, and your dreams. By carefully planning, selecting the right materials, and executing your vision with precision, you can create a truly unique and memorable piece. From intricate designs on graduation caps celebrating your major to witty sayings that capture the essence of your college years, every choice contributes to a personal statement. As you walk across that stage, remember that your cap isn't just a decoration – it's a testament to your journey, worn with pride for all to see. For more comprehensive advice on navigating your graduation journey, from gifts to attire, be sure to check out our ultimate graduation guide.
-d4c38c342cdf20ca.jpeg)


-b555fcc6b204c456.jpeg)


