-da0801079a650a2e.jpeg)
17 Year Anniversary Quotes: 110+ Funny, Romantic & Furniture Wishes (2026)
Mar, 12 2026
Carving pumpkins is one of the most beloved Halloween traditions, bringing creativity, fun, and a touch of spooky charm to the season. From classic jack-o’-lantern faces to detailed artistic designs, pumpkin carving is a festive activity for families, friends, and Halloween enthusiasts alike. In this ultimate guide to pumpkin carving ideas for Halloween, you’ll discover inspiration for every style and skill level—from cute and simple patterns to spooky, funny, and impressive carved creations. Whether you’re decorating your porch or planning a Halloween party, these ideas will help you create pumpkins that stand out all season long.
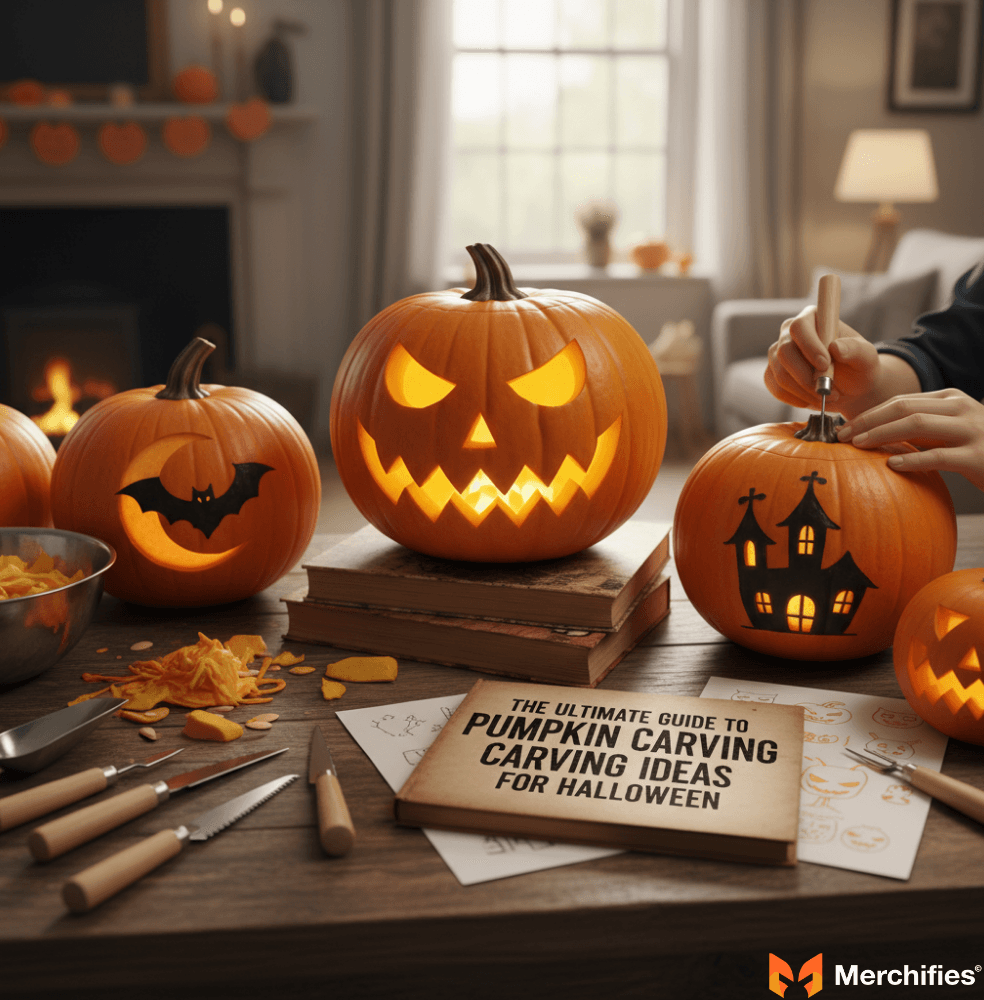
Halloween is a time for spooky fun, delicious treats, and, of course, the quintessential tradition of carving pumpkins. More than just a simple decoration, a well-carved pumpkin transforms a humble gourd into a glowing beacon of festive spirit. This ultimate guide will equip you with all the ideas and techniques you need to create your most impressive jack-o'-lantern yet, from selecting the perfect pumpkin to preserving your masterpiece.
Pumpkin carving is a cherished autumn ritual, transforming ordinary gourds into glowing works of art that capture the spirit of Halloween. It's an opportunity for creative expression, whether you're aiming for a classic spooky face or an intricate, modern design. This comprehensive guide provides carve a pumpkin ideas for every skill level, ensuring your pumpkin stands out.
Carving a pumpkin extends beyond mere decoration; it's a deeply rooted tradition that fosters creativity, community, and a tangible connection to the Halloween season. From the tactile experience of scooping out seeds to the satisfaction of seeing your design illuminated, the process itself is rewarding. In my experience recommending family Halloween activities, the annual pumpkin carving session, like the one my neighbors host every October 25th, consistently brings families together in a way that mere store-bought decor simply cannot replicate, sparking friendly competition and shared memories.
Historically, carved turnips and gourds were used in Ireland and Scotland to ward off evil spirits, a practice brought to America by immigrants who found the native pumpkin a much more suitable canvas. That said, the modern tradition is less about warding off spirits and more about celebrating the season, creating a welcoming, if sometimes eerie, glow for trick-or-treaters. It's a chance to craft a unique statement piece that reflects your personality, making it far more impactful than any mass-produced decor.

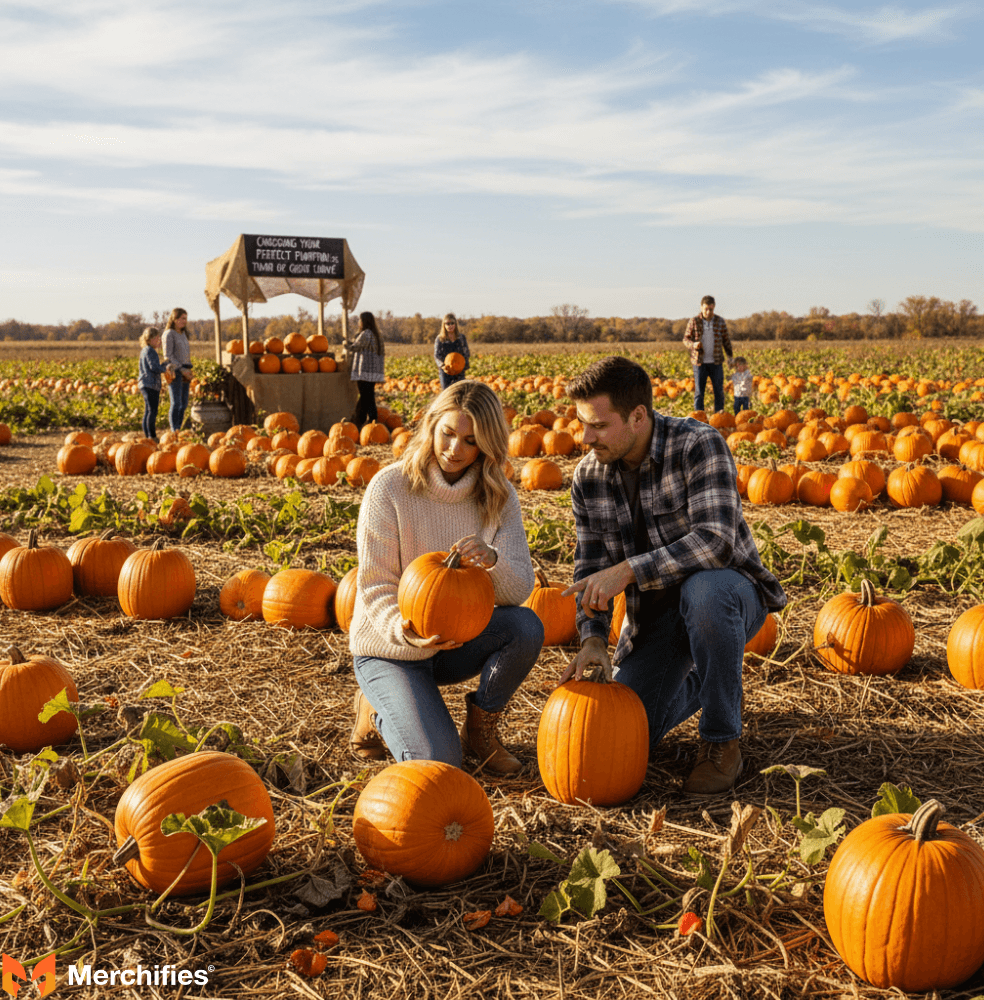
Selecting the right pumpkin is the critical first step to ensuring a successful and enjoyable carving experience. A good pumpkin not only provides a sturdy canvas but also influences the longevity and final appearance of your carved design. Don't rush this decision; a few extra minutes spent at the pumpkin patch can save you hours of frustration later.
When choosing a pumpkin, inspect it meticulously for size, shape, and stem integrity, as these factors dictate your carving possibilities. For intricate designs or a grand display, opt for larger pumpkins, often those weighing 15-20 pounds, like the 'Connecticut Field' variety, which provides ample surface area. Smaller pumpkins, such as 'Jack-Be-Little' varieties, are excellent for subtle accents or beginner projects.
Here's the thing: the shape of your pumpkin should ideally complement your intended design. A round, symmetrical pumpkin works best for traditional jack-o'-lantern faces or intricate geometric patterns, offering a balanced canvas. For more character-driven or whimsical carving pumpkin ideas, an oblong or naturally lumpy pumpkin can provide unique features that enhance a scary monster or a goofy character, like the crooked smile on a naturally flattened 'Cinderella' pumpkin. Honestly, don't bother with those perfectly smooth, blemish-free pumpkins if you're going for character; the ones with natural bumps and asymmetric shapes often make for the most compelling, ghoulish faces, adding organic texture that artificial means can't replicate.
On top of that, pay close attention to the pumpkin's skin and stem. The skin should be firm, free of soft spots, deep cuts, or blemishes that could compromise its structural integrity. A healthy, sturdy stem, ideally 2-3 inches long and firmly attached, is crucial for handling and can even be incorporated into your design, perhaps as a witch's nose or a creature's horn. Avoid pumpkins with broken or moldy stems, as this often indicates an unhealthy pumpkin that will rot quickly.
Having the right tools is paramount for achieving clean cuts and intricate details in your pumpkin carving. While a basic kitchen knife might suffice for simple tasks, specialized tools significantly enhance precision and safety. A good set of pumpkin carving suggestions always starts with the right equipment.
For beginners, a basic carving kit is a great starting point, typically including a small serrated saw, a scooper, and a poker tool. These kits, like the popular pumpkin masters series, provide the foundational implements needed for straightforward designs. That said, forget those flimsy plastic carving tools that come in cheap kits; they're a recipe for frustration and uneven cuts. Invest in a proper small serrated knife or a dedicated pumpkin carving kit with metal tools, such as the ones offered by Warren Cutlery, which provide much better leverage and sharpness.
As you advance, consider adding more specialized tools to your arsenal. A Dremel rotary tool, for instance, is invaluable for etching, shading, and creating fine details that traditional knives can't achieve. Drill bits of various sizes can create unique patterns or eyes, as seen in the stunning constellation pumpkins that gained popularity around 2018. Linoleum carving tools or clay sculpting tools are excellent for intricate 3D effects and skin removal, allowing you to create depth without cutting all the way through the pumpkin wall. For safety, always include a sturdy, non-slip cutting board and a pair of protective gloves.
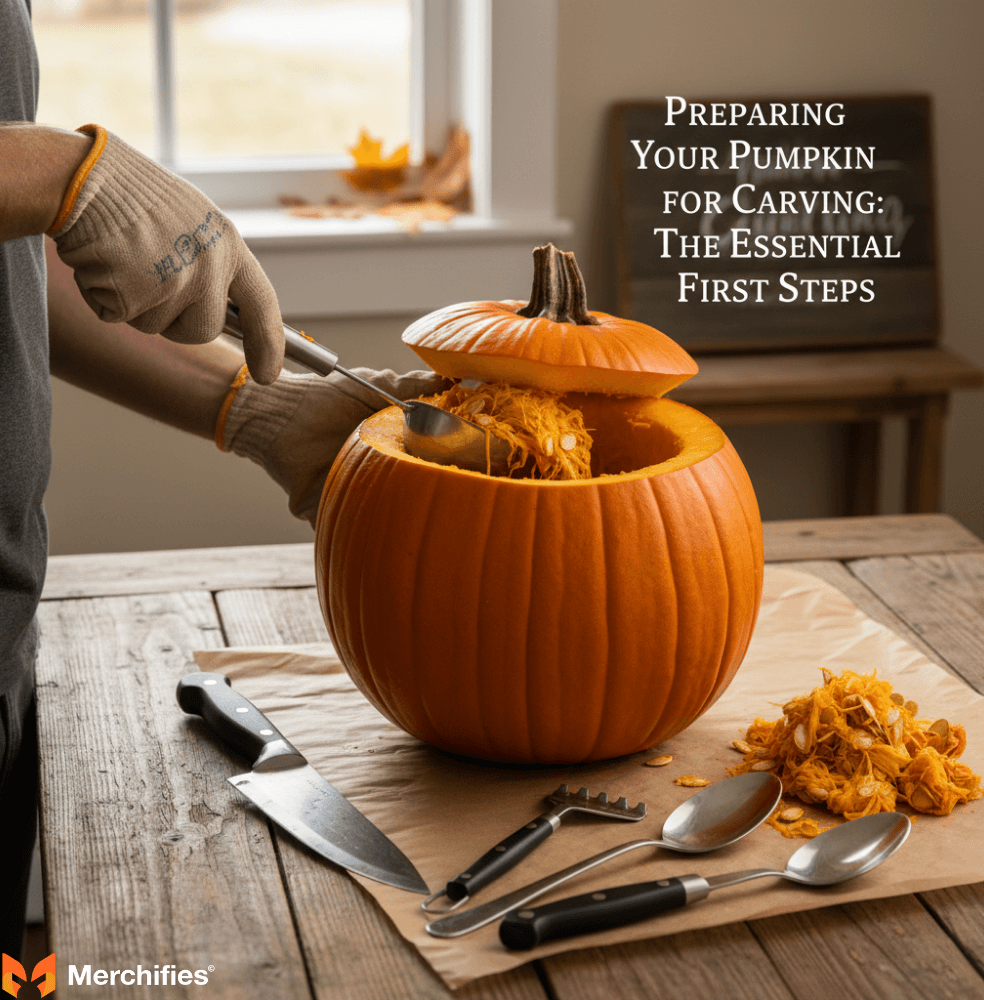
Proper preparation is key to a smooth carving process and a long-lasting jack-o'-lantern. Skipping these initial steps can lead to uneven cuts, difficult scooping, and premature decay. Think of it as laying a solid foundation for your artistic endeavor.
Cutting the lid is a fundamental step, and the choice between cutting from the top or bottom significantly impacts your pumpkin's longevity and display. Most people instinctively cut a circular lid from the top around the stem, which is perfectly fine for traditional designs.
However, for a pumpkin that lasts longer and is easier to light, cutting an access hole from the bottom is often superior. This matters because cutting from the bottom leaves the stem intact on the pumpkin, which helps retain moisture and prevents the pumpkin from drying out as quickly. When you cut from the bottom, you create a stable base, allowing the pumpkin to sit flat over a light source, like an LED candle, without the lid sinking in. In practice, a bottom cut also makes it easier to place and remove light sources without having to reach into the pumpkin from above, which can be messy. For example, in many professional pumpkin displays, like those seen at the Great Jack O'Lantern Blaze in Croton-on-Hudson, NY, bottom cuts are standard practice for their practical advantages and extended display life.
Regardless of your chosen method, cut at an angle – typically 45 degrees – rather than straight down. This bevel prevents the lid from falling inside the pumpkin once it begins to soften. For a top cut, notch a small triangle or square into the lid and the pumpkin rim; this serves as a guide to ensure the lid fits back perfectly every time, preventing frustrating alignment issues.
Thoroughly scooping out the pumpkin's guts and thinning its walls are crucial steps that impact both the ease of carving and the brilliance of your illuminated design. Don't underestimate this messy but vital process.
First, remove all seeds and stringy pulp. A large, sturdy scoop or even an ice cream scoop works wonders here. Ensure the interior is as clean as possible; any remaining pulp can accelerate rot. In my experience, a metal scoop with a sharp edge, like the one I've used for years from a specialized pumpkin carving kit, makes this task significantly easier than a flimsy plastic spoon, cutting through fibrous strands with minimal effort. On top of that, save those seeds! We'll talk about delicious recipes later.
Once clean, thin the pumpkin walls, especially in areas where you plan to carve intricate details. The ideal wall thickness is usually between 3/4 inch and 1 inch. This matters because thinner walls make it much easier to cut through, reducing the risk of cracking and allowing more light to shine through your design. If you're planning advanced etching or 3D effects, even thinner walls (down to 1/2 inch) might be necessary in specific areas. Use a scraping tool or the edge of your scoop to gradually shave away the interior flesh. Be careful not to make the walls too thin, as this can weaken the pumpkin's structure and lead to premature collapse. This step is often overlooked but is absolutely essential for achieving crisp lines and a bright, even glow from your finished carving pumpkin idea.
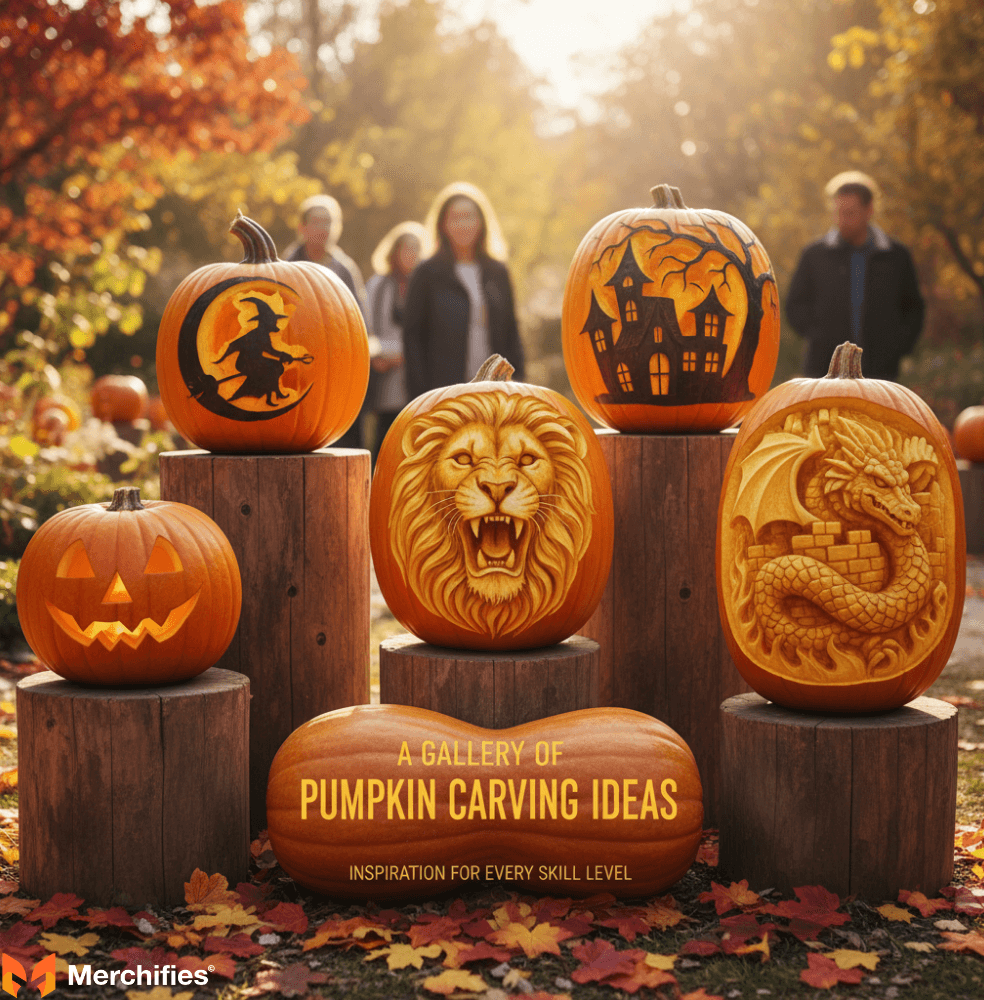
The possibilities for ideas for carving pumpkins are truly endless, ranging from timeless classics to cutting-edge artistic expressions. This section will walk you through a diverse gallery of inspiration, ensuring you find the perfect design to match your skill level and Halloween spirit.
The classic jack-o'-lantern, with its grinning face and triangular eyes, remains a timeless symbol of Halloween, embodying both spooky tradition and nostalgic charm. These designs are perfect for beginners, offering a straightforward entry into the world of pumpkin carving.
For a truly iconic look, consider the traditional toothy grin and menacing eyes, reminiscent of the jack-o'-lantern often depicted alongside the Headless Horseman in Washington Irving's 1820 classic, *The Legend of Sleepy Hollow*. You can vary the expression from gleefully sinister to genuinely terrifying by simply adjusting the angle of the eyes and the curve of the mouth. Another popular choice is the "Screaming Ghost" face, which involves wide, oval eyes and an exaggerated, wailing mouth. This design, a staple in many vintage Halloween decorations from the 1950s, creates a dramatic silhouette when lit.
Here's the thing: while a simple triangle-eyed jack-o'-lantern is a Halloween staple, it's arguably the most underutilized canvas. A slightly more intricate design, like the "Screaming Ghost" mentioned, or even adding simple eyebrows and a nose, elevates it from basic to genuinely chilling, showing that even subtle changes can have a huge impact. For an easy upgrade, try cutting out different sized circles for eyes and a wavy mouth instead of straight lines, creating a more organic and less cartoonish look. These jack o lantern carving ideas prove that sometimes, simplicity, when executed with a touch of flair, is the most effective.
When carving with children, safety and fun are paramount, making whimsical and kid-friendly designs an excellent choice. This category also embraces fantastic no-carve options, ensuring everyone can participate safely.
For younger children, simple shapes like stars, moons, or friendly ghost outlines are easy to cut with supervision or even with cookie cutters and a mallet. Think of the cute, wide-eyed ghost from *Casper the Friendly Ghost* (1995) – a simple, friendly silhouette works wonderfully. Animal faces like a smiling cat or a playful dog are also popular good ideas for pumpkin carving. Always involve an adult for any cutting, or allow children to poke holes along a stencil outline with a safe poker tool.
This matters because no-carve options open up a world of creativity without the sharp tools. Painting pumpkins is hugely popular; kids can paint their favorite cartoon characters, abstract patterns, or even create a "monster" pumpkin by gluing on googly eyes, yarn hair, and pipe cleaner limbs. For instance, a classic 'Mickey Mouse' pumpkin painted black with large red shorts and yellow buttons is instantly recognizable and completely safe. Decorating with stickers, glitter, permanent markers, or even fabric scraps allows for endless personalization. A simple pumpkin adorned with colorful felt shapes to create a Frankenstein's monster face, like the one from the classic 1931 film, is both effective and completely hands-on for little ones, proving that you don't need to cut to create an impressive Halloween display.
Animal and creature carvings offer a fantastic way to bring a touch of the wild, or the wonderfully creepy, to your Halloween decor. These designs can range from charming and cute to genuinely terrifying, appealing to a broad audience.
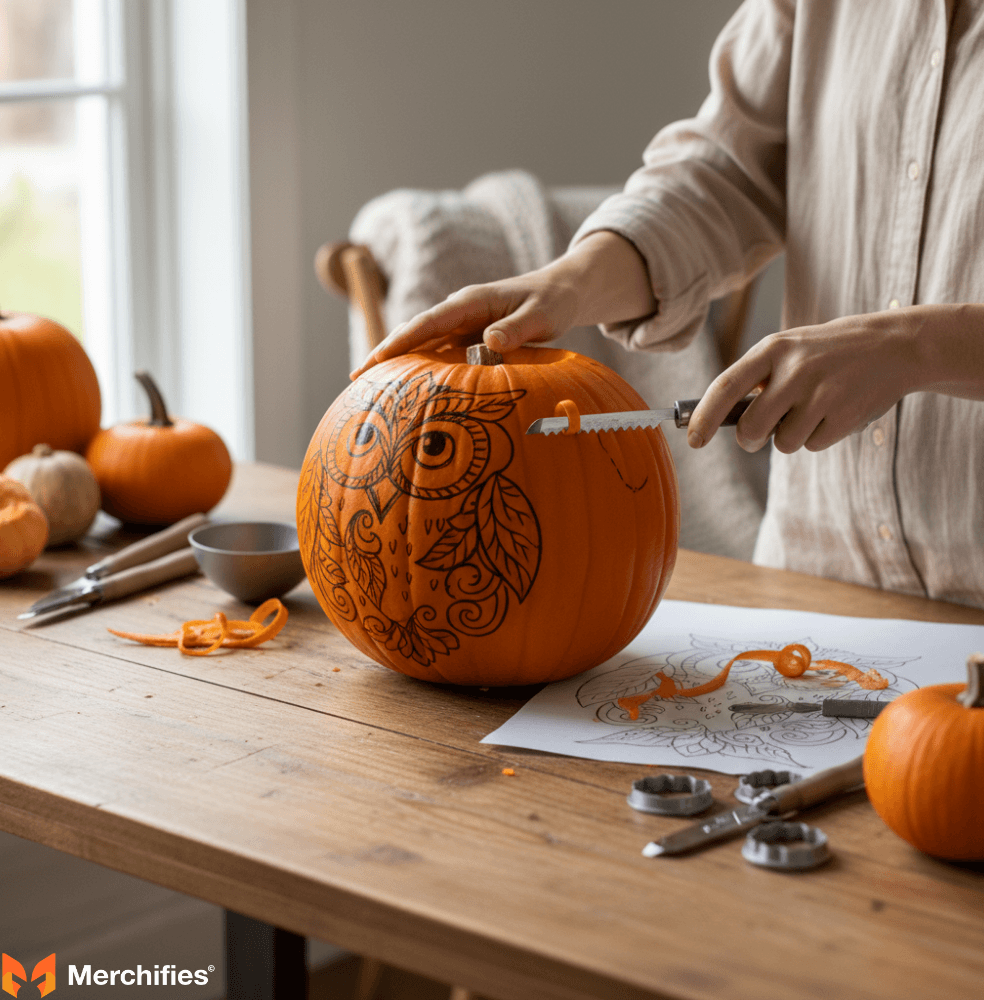
Consider intricate designs like a wise owl perched on a branch, its large eyes providing a captivating glow. This specific carve pumpkin idea often involves etching details into the pumpkin's skin to create feather texture before cutting out the eyes and beak. Spiders, with their multiple legs and eerie presence, are another popular choice. A large spider body can be carved into the pumpkin, with its legs either etched onto the surface or carved in relief. For a truly unsettling effect, carve a spider emerging from a web, like the giant Aragog from *Harry Potter and the Chamber of Secrets* (2002).
On top of that, bats flying across a moonlit sky, black cats with arched backs, or even a menacing wolf howling at the moon can all be stunning additions. For advanced carvers, a detailed dragon head, complete with scales and fiery eyes, can be a showstopper, often requiring 3D carving techniques. The key to successful animal carvings is to focus on distinctive features—the curve of a cat's tail, the segmented body of an insect, or the sharp talons of an eagle—to make the creature instantly recognizable. These designs often benefit from creative lighting that casts dramatic shadows, enhancing their lifelike or monstrous qualities.
Beyond traditional faces, nature-inspired and decorative patterns offer a sophisticated and often elegant approach to pumpkin carving, moving beyond the spooky into realms of artistry. These designs can be surprisingly intricate and visually stunning.
Think of delicate autumn leaves, like maple or oak, carved into the pumpkin's surface, allowing light to filter through their intricate veins. A swirling vine pattern, perhaps with small berries, evokes a natural, organic feel, perfect for a less overtly spooky Halloween display. Geometric patterns, such as spirals, zigzags, or interlocking shapes, can create a modern and abstract look. The precision required for these designs, often seen in minimalist art from the early 20th century, makes them particularly satisfying to execute, offering a clean aesthetic that stands out.
This matters because these types of carving pumpkins idea often rely heavily on etching and surface-level carving rather than full cut-throughs, allowing for subtle variations in light intensity. For instance, a mandala-inspired design, with its symmetrical and intricate patterns, can look breathtaking when illuminated, casting beautiful, complex shadows. You can also combine natural elements, like carving a tree silhouette with swirling branches, or use different sized drill bits to create a starry night sky effect, a technique that gained traction with popular space-themed decor in the late 2010s. These decorative approaches demonstrate that pumpkins can be elevated into genuine works of art, suitable for both Halloween and general autumn decor.
Pop culture and themed pumpkins allow you to showcase your fandom and create instantly recognizable, often humorous, displays. These designs are incredibly popular, drawing inspiration from movies, TV shows, video games, and even memes.
Consider carving the iconic silhouette of Darth Vader from *Star Wars* (1977), or the terrifying face of Pennywise the Clown from *IT* (2017). Characters like Jack Skellington from *The Nightmare Before Christmas* (1993) are perennial favorites, their distinct features translating exceptionally well to a pumpkin canvas. Honestly, while Baby Yoda pumpkins were everywhere in 2020, the real art is in capturing a less obvious but equally beloved character, like the intricate silhouette of Oogie Boogie from *The Nightmare Before Christmas*, whose burlap texture can be mimicked with careful etching.
Beyond individual characters, you can create entire scenes. Imagine carving the Hogwarts crest from *Harry Potter*, or a scene depicting the classic ghost-catching moment from *Ghostbusters* (1984), complete with proton packs and a Slimer outline. Video game enthusiasts might opt for a 'Minecraft' creeper face or the 'Legend of Zelda' Triforce symbol. When tackling these themed ideas for pumpkin carving, it's crucial to find high-quality stencils or reference images to capture the essence of the character or logo accurately. This approach transforms your pumpkin into a statement piece that not only celebrates Halloween but also your personal passions.
For those looking to push the boundaries of traditional pumpkin carving, unique and creative concepts offer truly spectacular results. These ideas often blend carving with other art forms, creating unforgettable displays.
Diorama pumpkins, for example, involve carving out a large section to create a small window or stage inside the pumpkin, then populating it with miniature figures or scenes. Imagine a spooky graveyard diorama complete with tiny tombstones and zombie figures, or a fairy garden featuring small elves and moss. This technique, which gained traction with intricate Halloween displays in the mid-2010s, transforms the pumpkin into a contained storytelling piece. Drilled designs, using various drill bit sizes, can create stunning patterns of light, from constellations and starscapes to abstract dot art. This method is particularly effective for achieving a delicate, ethereal glow that traditional cuts can't replicate.
On top of that, incorporating other elements directly into the pumpkin can yield striking results. Succulent pumpkins, where the top of the pumpkin is removed and the interior filled with soil to house a beautiful arrangement of succulents, offer a stylish, long-lasting, and non-traditional autumn display. Another creative approach is to carve multiple pumpkins and arrange them to form a larger picture or a multi-pumpkin creature, like a giant caterpillar or a multi-headed monster. These pumpkin carved ideas require a bit more planning and execution but promise to be memorable centerpieces that showcase genuine artistic flair.
Pumpkins don't just have to be decorative; they can also be functional, adding a practical and charming element to your Halloween festivities. These ideas integrate utility with festive design.
A classic functional pumpkin idea is to carve it into a candy bowl. This involves carving a wide opening at the top or side, often with a decorative rim, to create a receptacle for Halloween treats. Imagine a pumpkin carved with a whimsical monster mouth, its open maw ready to accept candy for trick-or-treaters. This approach not only serves a purpose but also adds an interactive element to your decor. Another popular functional use is as path lights. Smaller pumpkins, carved with simple designs or drilled patterns, can be placed along walkways or staircases, illuminated by small LED candles, guiding guests with a warm, festive glow. This is especially effective when using several mini pumpkins, like the 'Munchkin' variety, each with a unique, simple design.
Beyond these, pumpkins can be transformed into creative beverage coolers for outdoor parties by hollowing them out and filling them with ice, a clever idea I saw at a Halloween block party in 2019. They can also serve as unique planters for autumn flowers or even as creative holders for party utensils. The key here is to consider how the pumpkin can enhance the overall guest experience while still maintaining its festive appeal. These halloween pumpkins ideas carving demonstrate that pumpkins are incredibly versatile, capable of being both beautiful and useful.
Transforming a design from paper to pumpkin requires precision and the application of specific carving techniques. Mastering these steps will ensure your final product looks professional and polished, turning your pumpkin carving idea into reality.
Accurately transferring your chosen design onto the pumpkin is a crucial step that sets the stage for a successful carve. There are several methods, each suited for different skill levels and design complexities.
Stencils are the easiest and most common method, especially for beginners or intricate patterns. Simply tape your printed stencil onto the pumpkin, smoothing out any wrinkles. Then, use a poker tool (often found in carving kits) to prick small holes along the outlines of your design, creating a dotted guide on the pumpkin's surface. This technique, widely taught in beginner carving guides, ensures accuracy and consistency. For a more detailed transfer, carbon paper can be placed between the stencil and the pumpkin, allowing you to trace the design directly onto the surface with a pen or pencil. This matters because it provides a continuous line guide, reducing the chance of errors during carving.
Freehand drawing is ideal for experienced carvers or those with simpler, organic designs. Use a dry-erase marker or a permanent marker (which can be wiped off with rubbing alcohol if you make a mistake) to sketch your design directly onto the pumpkin. This method offers the most flexibility, allowing for on-the-fly adjustments and truly unique, spontaneous creations. In my experience, freehanding works best for abstract designs or exaggerated monster faces where perfect symmetry isn't the goal, like the wonderfully asymmetrical goblins I saw carved at a local pumpkin festival in 2021, which had a raw, artistic appeal. Whichever method you choose, ensure the design is clearly visible before you begin cutting.
Achieving clean, precise cuts is fundamental to a well-executed pumpkin carving. These basic techniques form the bedrock of all successful designs, regardless of complexity.
Always hold your carving tool like a pencil, with a firm but comfortable grip, and use a sawing motion rather than pushing straight through. This matters because a sawing motion reduces the effort required and minimizes the risk of the blade getting stuck or slipping, which could lead to injury or an uneven cut. For straight lines, use a small, serrated saw. Keep your cuts perpendicular to the pumpkin's surface unless you're intentionally beveling. When carving an interior piece, cut out the entire shape before pushing it through from the inside out; this prevents jagged edges and splintering. For example, when creating the eye shape of a traditional jack-o'-lantern, complete the entire outline before gently nudging the piece out. On top of that, maintaining a steady hand and taking your time are crucial. Rushing often leads to mistakes that are difficult to correct.
When cutting curves, pivot the pumpkin or your wrist slightly, allowing the blade to follow the contour of the design. Small, short strokes are more controllable than long, sweeping ones, especially on tight curves. For very intricate details, a craft knife or a specialized detail tool with a fine blade, like those found in professional carving kits, will offer the best control. Always carve away from your body and fingers, ensuring a safe distance between the blade and your non-carving hand. These foundational pumpkin carving ideas techniques are simple but require practice to master, ultimately leading to sharper lines and a more professional finish.
For experienced carvers, advanced techniques like etching, 3D effects, and shading elevate pumpkins from simple cutouts to intricate sculptures. These methods add depth, texture, and realism, making your ideas of pumpkin carving truly stand out.
Etching involves removing only the outer layer of the pumpkin's skin, rather than cutting all the way through. This allows light to glow softly through the thinned rind, creating subtle highlights and shadows. Tools like linoleum cutters, Dremel rotary tools, or even clay sculpting tools are excellent for this. You can etch details like hair, fur, wrinkles on a monster's face, or intricate patterns onto a leaf, as seen in the stunning 'Pumpkin King' designs that often feature etched crown details. This matters because etching adds a whole new dimension of artistry, allowing for gradients of light and detailed textures that full cut-throughs cannot achieve.
3D carving takes this a step further, involving removing varying depths of pumpkin flesh to create relief effects. This can mean carving away the background to make a design pop out, or sculpting features like noses, ears, or teeth directly from the pumpkin's thick walls. For example, creating a lifelike gargoyle often involves sculpting its brow and jawline in three dimensions. Shading, often achieved through careful etching and thinning, manipulates light to create a sense of depth and form. By varying the thickness of the pumpkin wall, you can make certain areas glow brighter or appear darker, adding dramatic contrast. In my experience, the most impactful advanced pumpkin carvings, like the highly detailed character busts seen at specialized carving competitions since the early 2000s, masterfully combine these techniques to achieve an almost sculptural quality, making the pumpkin appear alive.
Safety should always be the top priority when engaging in pumpkin carving, regardless of age or skill level. Following comprehensive guidelines prevents accidents and ensures a fun, injury-free experience for everyone.
For children, direct adult supervision is non-negotiable. It's best to assign adults to all cutting tasks, while children can focus on design, scooping, and no-carve decorations like painting or applying stickers. If children insist on participating in cutting, use kid-safe tools such as plastic serrated knives from dedicated carving kits or cookie cutters tapped gently with a mallet. This matters because traditional kitchen knives are too sharp and unwieldy for small hands, leading to a high risk of cuts. Always ensure a clean, dry, and stable work surface to prevent slips.
For adults, always use sharp, appropriate tools. Dull knives require more force, increasing the chance of slippage and injury. Cut slowly and deliberately, always directing the blade away from your body and hands. Wear protective gloves if you're prone to nicks or if you have sensitive skin that reacts to pumpkin sap. Never carve while distracted, under the influence of alcohol, or in poor lighting. Proper lighting is crucial for visibility and precision. If using power tools like a Dremel, wear safety glasses to protect your eyes from flying debris and follow the manufacturer's instructions carefully. Keep a first-aid kit nearby for minor cuts. By prioritizing these safety measures, your pumpkin carving experience remains enjoyable and focused on creativity, not caution.
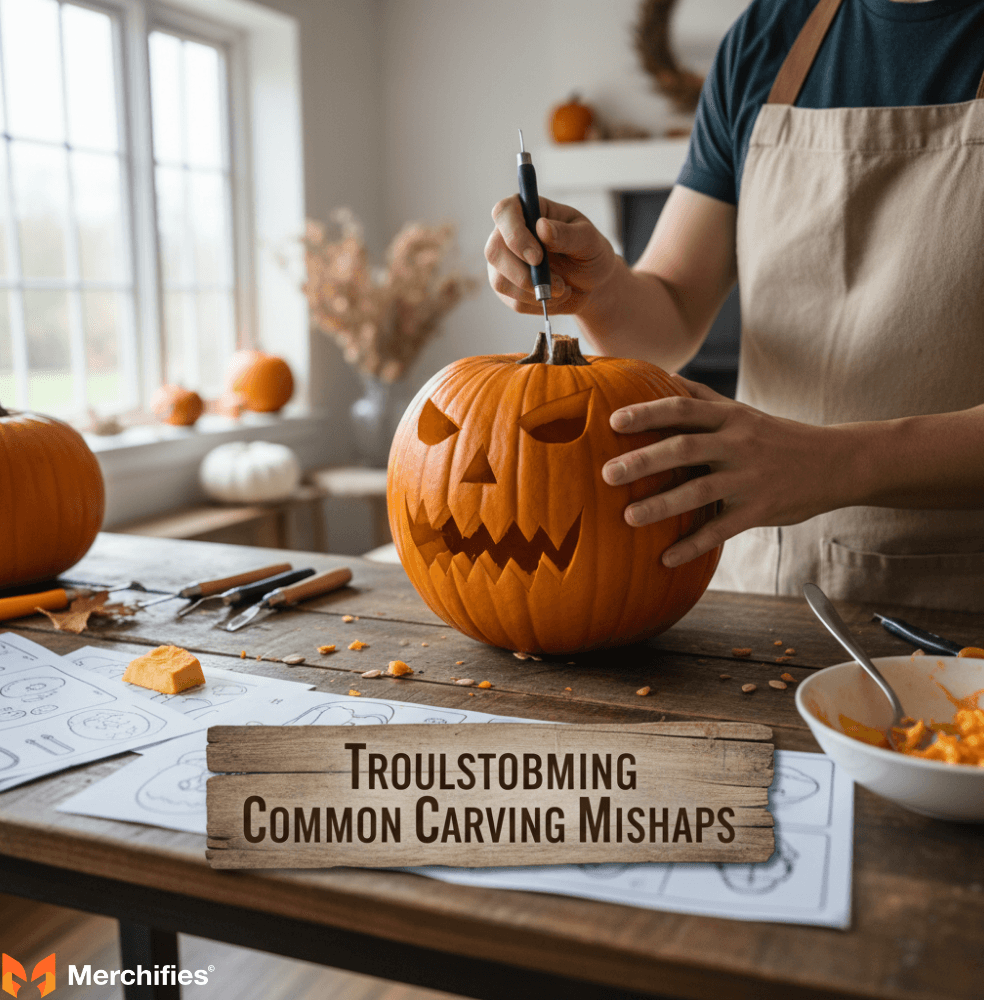
Even the most seasoned carvers can encounter unexpected challenges during the pumpkin carving process. Knowing how to troubleshoot common mishaps can save your masterpiece from disaster and turn a potential problem into a minor setback.
Cracks and broken pieces are common carving mishaps, but they don't necessarily spell the end for your pumpkin. With a few tricks, you can often salvage your design and keep your pumpkin looking its best.
For small cracks, a simple solution is to apply petroleum jelly (like Vaseline) along the crack. This helps seal the crack, prevents it from spreading, and also adds moisture, which can help prolong the pumpkin's life. For larger cracks or breaks, especially if a piece has completely detached, toothpicks are your best friend. Carefully align the broken piece with its original position, then gently push one or two toothpicks through the broken piece and into the surrounding pumpkin flesh, creating a makeshift internal support. This technique, which I've used successfully on a particularly fragile bat wing design in 2017, effectively reattaches the segment. You can then apply petroleum jelly around the repair for extra stability and to camouflage the seam. This matters because it allows you to continue with your original design without having to start over, saving time and effort.
Uneven cuts and the need for design adjustments are common issues that arise during carving. Knowing how to address them can significantly improve the final appearance of your pumpkin.
If you've made an uneven cut, don't despair. For minor imperfections, a small craft knife or linoleum cutter can be used to carefully shave away excess pumpkin flesh, smoothing out jagged edges. Take your time and make very small, controlled cuts to refine the shape. If a cut is too wide, you might be able to strategically re-carve the surrounding area to create a new, intentional design element. For example, a slightly oversized eye can be reshaped into a more stylized, exaggerated monster eye, or a jagged line can become part of a "broken" or "cracked" texture.
This matters because sometimes, embracing the mistake can lead to an even more creative outcome. If a design element isn't working as planned, don't be afraid to adjust it. Maybe that intricate swirl needs to become a simpler star, or a complex character face needs to be reimagined as a more abstract ghoul. In my experience, some of the most unique ideas for pumpkins carvings have come from on-the-fly adaptations when an initial design wasn't translating well to the pumpkin's specific shape or texture. Keep a dry-erase marker handy to sketch out potential adjustments directly on the pumpkin before making new cuts. Flexibility and a willingness to adapt are key to overcoming these challenges and still producing an impressive carved pumpkin.
You've poured your heart and soul into creating a stunning carved pumpkin; now, the goal is to make it last as long as possible. Proper preservation techniques can extend its life by several days, sometimes even a week or more.
To make your carved pumpkin last longer, apply post-carving treatments immediately to maintain freshness and prevent mold. The pumpkin's cut surfaces are vulnerable to drying out and bacterial growth, so addressing these issues proactively is key.
First, thoroughly clean the interior of the pumpkin one last time, removing any remaining stringy bits. Then, liberally apply petroleum jelly (Vaseline) or vegetable oil to all cut edges, both inside and out. This creates a protective barrier that seals in moisture and prevents the pumpkin flesh from drying out and shriveling, a common culprit for premature decay. This matters because it also helps repel some insects. On top of that, a diluted bleach solution (1 teaspoon of bleach per gallon of water) or a lemon juice spray can be used to mist the entire pumpkin, inside and out. This acts as an antifungal and antibacterial agent, significantly inhibiting mold growth. For example, a pumpkin treated this way, like the one I prepped for a community display in 2022, can realistically last 5-7 days longer than an untreated one, especially in mild weather.
Alternatively, some carvers swear by submerging the entire carved pumpkin in a cold water bath for several hours (or even overnight) to rehydrate it, especially if it's already started to shrivel. After soaking, pat it dry and then apply the petroleum jelly. Repeat the bleach or lemon juice spray every few days to keep mold at bay. These how can I make my carved pumpkin last longer tips are simple yet highly effective.
Where and how you display your carved pumpkin significantly impacts its lifespan. Different environments present different challenges, requiring tailored display strategies.
For outdoor display, choose a cool, shaded location away from direct sunlight, which can accelerate drying and rotting. While a front porch is traditional, placing it under an awning or on the north side of your house can help. Protect it from rain and frost, which can cause the pumpkin flesh to break down rapidly. If temperatures drop significantly at night, consider bringing your pumpkin indoors or covering it. This matters because extreme weather fluctuations are a primary enemy of carved pumpkins. For example, a pumpkin I carved for an outdoor display in 2016, which was exposed to a sudden cold snap, shriveled noticeably within 24 hours.
Indoors, the challenge is often dry air and warmth from heating systems. Keep your pumpkin away from heat vents, fireplaces, or direct sources of light that generate heat. A cool, humid environment is ideal. If your house is very dry, periodically misting the inside of the pumpkin with water (or the diluted bleach/lemon juice solution) can help. When not on display, storing your pumpkin in a refrigerator can extend its life for several days, especially if you have a large enough space. Regardless of location, always use LED lights or battery-operated candles instead of real flame candles, as the heat from a flame will cook the pumpkin from the inside, significantly shortening its lifespan. By carefully considering these display strategies, you can enjoy your carved pumpkin ideas for as long as possible.

The carving is only half the battle; how you light and display your pumpkin can dramatically enhance its impact, transforming it into a captivating centerpiece. Think beyond the basic candle for truly innovative effects.
Innovative lighting options can bring your carved pumpkin to life, creating dynamic and mesmerizing effects that traditional candles simply cannot achieve. This matters because the right light can completely change the mood of your design.
LED lights are a game-changer for pumpkin illumination. Battery-operated LED tea lights or puck lights are safe, cool, and come in various colors. Color-changing LED lights, often controlled by a remote, allow you to cycle through hues, bathing your pumpkin in an eerie green, a fiery red, or a ghostly blue, perfect for adding a theatrical touch to your jack o lantern ideas. For a more dramatic effect, consider using small LED strobe lights inside your pumpkin, creating a flickering, unsettling ambiance. This can make a monster face appear to twitch or a spooky scene seem to come alive intermittently, a technique often used in haunted houses since the late 1990s.
On top of that, mini projectors, typically designed for small spaces, can cast moving images or patterns onto the pumpkin's interior, creating a dynamic backdrop for your carved features. Imagine a swirling vortex or ghostly figures projected from within. Some advanced setups even involve placing a small speaker inside the pumpkin to synchronize sound effects with the lighting, like a cackling witch's laugh accompanying a flickering green light. These options not only eliminate the fire hazard of real candles but also provide a level of versatility and visual impact that will make your pumpkin display truly unforgettable.
Arranging multiple pumpkins and creating themed displays elevates your Halloween decor from individual pieces to a cohesive, immersive experience. This approach tells a story and amplifies the festive atmosphere.
Consider grouping pumpkins of varying sizes and carving styles. A large, scary jack-o'-lantern can be flanked by smaller, whimsical ones, creating a narrative of "big scary monster and its little minions." Or, arrange a series of pumpkins to depict a progression, like a set of faces showing different stages of fright, as seen in many haunted attraction displays. A popular carving halloween pumpkin ideas theme is a "pumpkin patch" display, where several carved pumpkins are arranged together with hay bales, corn stalks, and perhaps some fall foliage, creating a rustic and inviting scene.
This matters because thematic consistency creates a more impactful visual. For example, a "haunted forest" theme might involve pumpkins carved with owls, bats, and ghostly figures, intermingled with bare branches and artificial spiderwebs. A "candy corn" theme could feature pumpkins painted or carved in yellow, orange, and white stripes. You can also use uncarved pumpkins, gourds, and other autumn elements to fill in gaps and add texture to your display. By thinking about your pumpkins as components of a larger tableau rather than isolated objects, you can create a truly memorable and engaging Halloween presentation that draws the eye and sparks the imagination.
Outdoor pumpkin displays face unique challenges from weather and pests. Proactive protection strategies are essential to ensure your hard work isn't undone by nature or hungry critters.
To shield your pumpkins from rain and excessive moisture, position them under an overhang, porch roof, or even a large umbrella. A clear sealant spray designed for outdoor crafts can add a layer of protection against moisture, though reapplication may be necessary. For unexpected cold snaps, cover your pumpkins with a tarp or bring them indoors overnight. This matters because prolonged exposure to moisture and extreme temperatures accelerates decomposition and mold growth. In my experience, even a light frost, like the one that hit upstate New York in late October 2020, can cause delicate carved edges to soften and collapse almost overnight.
Pests like squirrels, raccoons, and even deer are notoriously attracted to pumpkins. To deter them, try spraying your pumpkins with a mixture of water and cayenne pepper or hot sauce; animals dislike the taste and smell. Commercial pest deterrents are also available. Placing your pumpkins on elevated surfaces or in areas with motion-activated lights can also discourage nocturnal visitors. Some carvers even string fishing line around their display areas, creating an invisible barrier that can startle and deter larger animals without harming them. By implementing these protective measures, your creative pumpkin ideas for carving will stand a much better chance against the elements and wildlife.

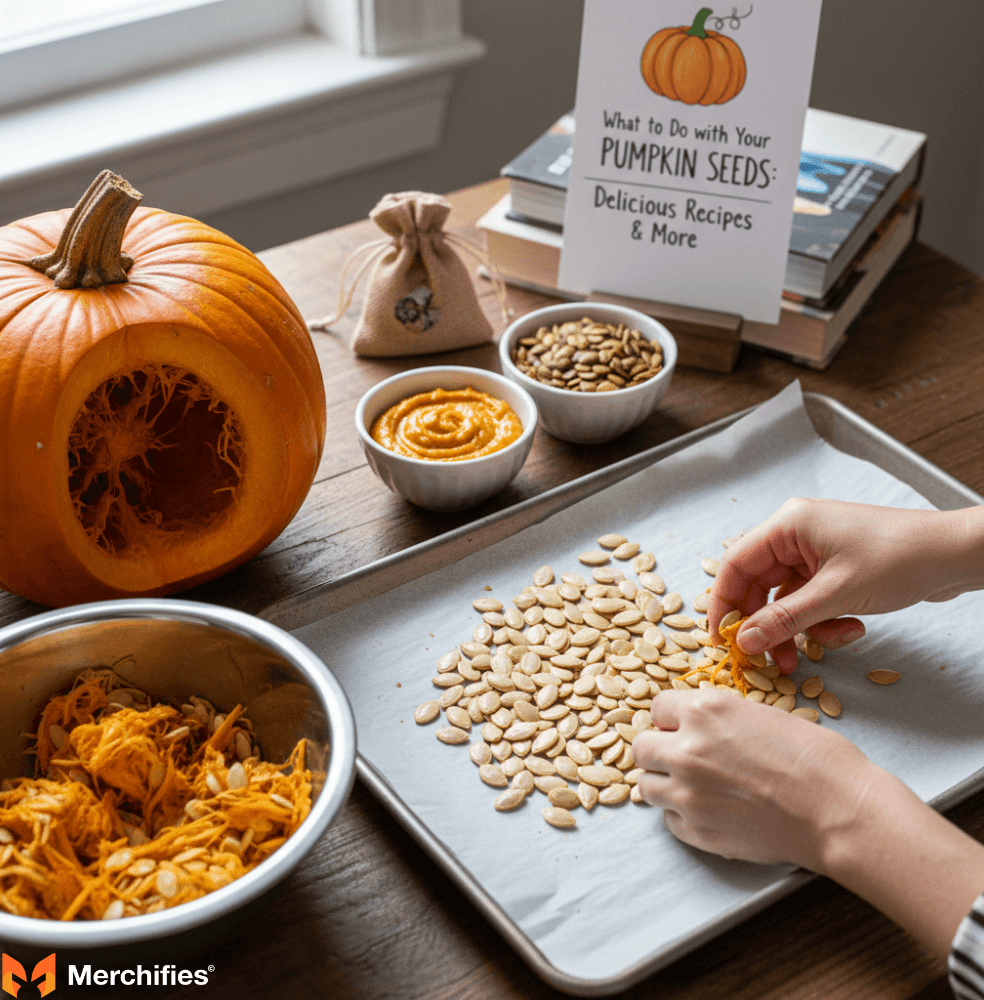
Don't let the best part of pumpkin gutting go to waste! Pumpkin seeds are not only a delicious and nutritious snack but also offer other creative uses. This section provides what should I do with the pumpkin seeds and pulp ideas.
Roasted pumpkin seeds are a quintessential autumn snack, easy to prepare, and incredibly versatile in flavor. They're packed with nutrients like magnesium, zinc, and healthy fats.
The classic preparation involves cleaning the seeds thoroughly, patting them dry, then tossing them with a tablespoon of olive oil and a pinch of salt before roasting at 300°F (150°C) for 20-30 minutes, or until golden brown and crispy. This simple method, a staple in many American homes every fall, highlights their natural, nutty flavor. However, don't stop there! Creative flavor variations can elevate this simple snack into something extraordinary. For a savory kick, toss them with garlic powder, onion powder, and a dash of paprika. For a spicy version, add cayenne pepper and chili powder. Sweet variations are also popular; try cinnamon sugar, a drizzle of maple syrup, or even pumpkin pie spice for a festive treat.
This matters because the drying step is crucial for crispiness; wet seeds will steam instead of roast. In my experience, spreading the seeds in a single layer on a baking sheet prevents overcrowding and ensures even roasting. Keep an eye on them, as they can go from perfectly toasted to burnt quickly. Roasted pumpkin seeds make an excellent topping for salads, soups, or yogurt, adding a delightful crunch and a burst of flavor. They're a delicious and healthy way to utilize every part of your Halloween pumpkin.
While often discarded, pumpkin pulp (the stringy flesh you scoop out) has more potential than just the compost bin. With a little effort, it can be transformed into delicious culinary creations.
The best use for pumpkin pulp is often in purees. After separating the seeds, simmer the pulp with a small amount of water until very soft, then strain and blend it into a smooth puree. This homemade pumpkin puree can be used in a myriad of recipes, from classic pumpkin pie, like the traditional holiday dessert, to pumpkin bread, muffins, or even a creamy pumpkin soup. It offers a fresher, more robust flavor than canned varieties. You can also use the puree to make savory dishes like pumpkin risotto or a flavorful sauce for pasta. This matters because it reduces food waste and provides a healthier, less processed alternative to store-bought ingredients.
On top of that, for a simpler approach, the pulp can be added directly to stocks or broths to infuse them with a subtle pumpkin flavor, particularly good for autumn-themed soups. Some adventurous cooks even use the stringy bits in smoothies, blending them finely to add fiber and nutrients without altering the texture too much. While it requires a bit more effort than simply tossing it, utilizing pumpkin pulp in your cooking is a rewarding way to maximize the value of your Halloween pumpkin, turning a discarded byproduct into a culinary asset.
Once Halloween is over and your carved pumpkin has served its purpose, responsible disposal is key. Instead of sending it to a landfill, where it produces harmful methane gas, consider eco-friendly options like composting.
Composting is by far the best way to dispose of your pumpkin. Pumpkins are 100% biodegradable and nutrient-rich, making them excellent additions to a compost pile. Simply break the pumpkin into smaller pieces to speed up decomposition. Remove any candles, lights, or non-biodegradable decorations before adding it to your compost bin. This matters because composting returns valuable nutrients to the soil, enriching gardens and reducing landfill waste. Many communities, especially since the rise of environmental awareness in the 2000s, even offer municipal composting programs or special pumpkin drop-off events after Halloween, making it easy to dispose of them responsibly. Check with your local waste management services for options in your area.
If composting isn't an option, consider burying your pumpkin in your garden. It will naturally decompose and nourish the soil. Alternatively, some farms or animal sanctuaries accept pumpkins as treats for livestock like pigs or goats, but always call ahead to confirm before dropping off. Avoid simply throwing pumpkins into natural areas, as this can attract pests and disrupt local ecosystems. By choosing composting or other eco-friendly disposal methods, you complete the pumpkin's lifecycle responsibly, minimizing your environmental impact after the Halloween fun is over.
From selecting the perfect gourd to showcasing your illuminated masterpiece, the journey of pumpkin carving is a rewarding autumn tradition. We've explored a vast array of carving a pumpkin ideas, detailed essential tools and techniques, and even covered how to preserve your creation and dispose of it responsibly. Armed with this comprehensive guide, you're now ready to tackle any design, impress your neighbors, and truly unleash your creativity this Halloween season. Your best carved pumpkin yet is just waiting to be brought to life!
-d4c38c342cdf20ca.jpeg)


-b555fcc6b204c456.jpeg)


