Merchifies.com
Share

How to Safely Remove Embroidery Stitches from Fabric (Without Leaving a Trace)

This step-by-step guide explains how to safely remove embroidery stitches from fabric without damaging the material or leaving visible marks. Learn the best tools, techniques, and precautions for different fabrics, helping you fix mistakes, reuse garments, or update designs with clean, professional results.

How to Safely Remove Embroidery Stitches from Fabric (Without Leaving a Trace)

Blog Post Contents

Have you ever found yourself looking at a beloved garment, a cherished bag, or even a brand-new item, wishing you could “undo” that embroidered design? Maybe it’s a company logo on a jacket you want to repurpose, a personalized gift with a misspelled name, or simply an old design that no longer suits your style. Learning how to remove embroidery can feel like a daunting, irreversible task, but with the right approach and a good dose of patience, it’s a completely achievable DIY project.

As an instructional content specialist with years of hands-on experience simplifying complex tasks, Mason Ellis Grant knows the value of clear, actionable guidance. This comprehensive guide on how to remove embroidery—informed by Mason’s methodical approach to troubleshooting and DIY projects—will walk you through the entire process, from gathering your essential tools to finishing the fabric, ensuring you get the cleanest possible result. By following these proven steps, you can save cherished items, correct errors, or give new life to something old.

Why You Might Need to Remove Embroidery

There are numerous reasons why someone might embark on the task of removing embroidery:

  • Correcting a design mistake or unwanted stitching: From a single misplaced stitch to an entire design error.
  • Repurposing a garment: Removing an old company logo or school emblem from a uniform to give the item a new identity.
  • Updating old or out-of-style designs: Giving vintage clothing a modern refresh.
  • Personalizing a secondhand item: Removing existing embellishments to make it truly your own.
Why You Might Need to Remove Embroidery

Essential Tools for Successful Embroidery Removal

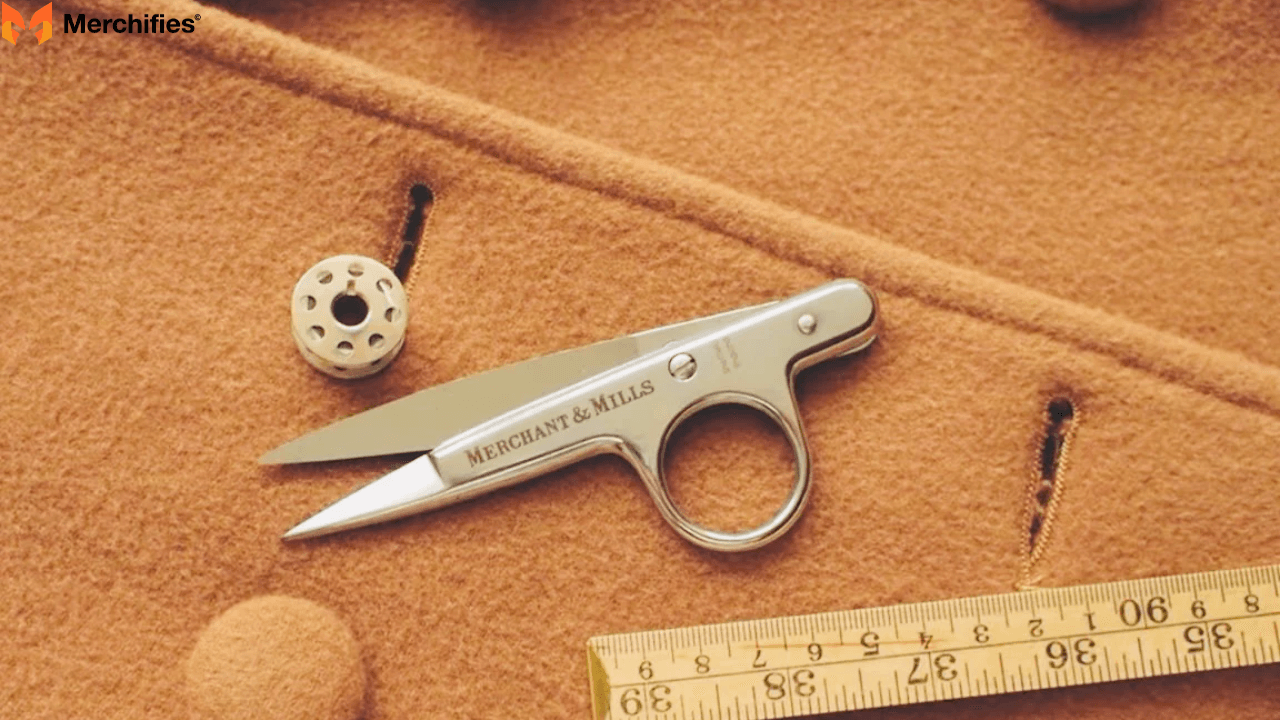
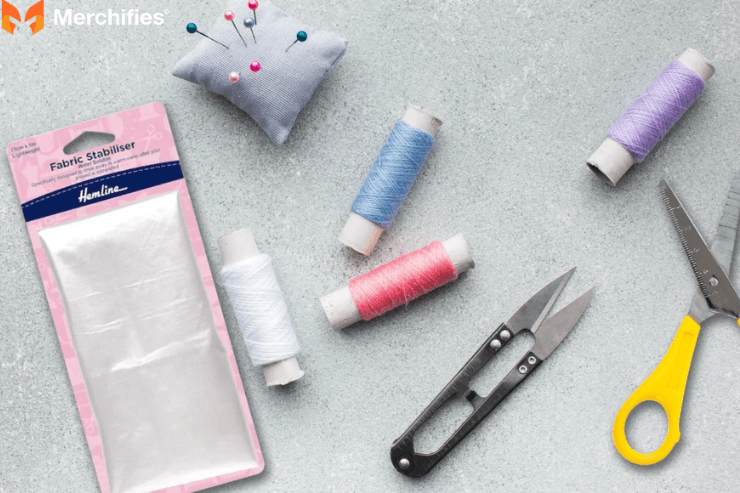
Before you begin, gathering the right tools is crucial for both efficiency and preventing damage to your fabric. A well-prepared workstation, as Mason Ellis Grant emphasizes in his guides, lays the foundation for success in any detailed task.

  • Seam Ripper: This is your primary weapon. While a standard seam ripper works, a fine-point or surgical seam ripper offers superior precision, especially for dense or intricate designs.
  • Small, Sharp Scissors: Ideal for snipping stubborn threads or making precise cuts where a seam ripper might be too bulky.
  • Tweezers: Indispensable for pulling out loose and tiny thread fragments without snagging the fabric.
  • Lint Roller or Stiff Brush: For meticulously cleaning up residual fuzz and tiny threads after removal.
  • Magnifying Glass (Optional but Recommended): Especially helpful for intricate stitches or those with less-than-perfect eyesight, ensuring you don't accidentally cut the base fabric.
  • Good Lighting: Absolutely critical. Natural light or a strong task lamp will help you see individual stitches clearly and avoid costly errors.
  • Flat, Stable Work Surface: A clean, flat table allows you to keep the fabric taut and steady, providing better control over your tools.

Step-by-Step Guide: How to Safely Remove Embroidery from Fabric

This methodical approach, grounded in Mason Ellis Grant's commitment to clarity and user safety, will guide you through removing embroidery without damaging your item.

Step-by-Step Guide How to Safely Remove Embroidery from Fabric

Step 1: Prepare Your Work Area and Fabric

Begin by ensuring your workspace is well-lit, clean, and stable. Lay the embroidered item flat and take a moment to identify both the front and back of the embroidery. This initial assessment is key. A valuable tip from years of troubleshooting is to consider testing a small, inconspicuous area if you're at all unsure about the fabric's durability or how it will react to tension.

Step 2: Carefully Access and Snip the Bobbin Threads (Back of Embroidery)

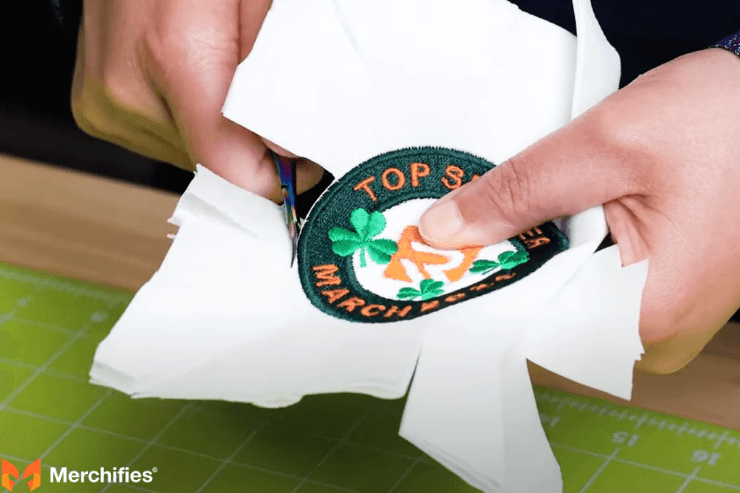
Turn the fabric inside out so you are looking directly at the back of the embroidery. Here, you'll locate the bobbin threads—these are often a single, consistent line of stitching that essentially anchors the top embroidery threads in place. Using your seam ripper or small scissors, carefully snip these bobbin threads. Work in small sections, perhaps a half-inch at a time, to maintain control. Exercise extreme caution; the goal is to cut only the bobbin threads, not the base fabric itself.

Step 3: Remove the Top Embroidery Threads (Front of Embroidery)

Flip the fabric back to the front side. With the bobbin threads snipped, the top embroidery threads should now be significantly loosened. Gently brush, pick, or rub at the loosened threads. You'll find that many will lift away easily. For more stubborn or larger pieces, use your tweezers to carefully pull them out. A methodical approach works best here: start from one edge of the design and work your way across.

Step 4: Clean Up All Remaining Threads and Fuzz

Once the main embroidery is gone, a flurry of tiny thread fragments and lint will likely remain. Use a lint roller, a stiff brush, or even strong adhesive tape to meticulously remove all these remnants from both the front and back of the fabric. It’s important to inspect the area carefully under good light to ensure no small pieces are missed, as these can become embedded.

Step 5: Smooth Out Fabric Impressions and Indentations

After removal, the fabric fibers where the embroidery once sat may be compressed, leaving slight impressions or indentations, often called "ghosting." To help restore the fabric's original texture, gently stretch the area in all directions to encourage the fibers to relax. Then, apply steam to the area (using a steam iron or a handheld steamer) and lightly press the area with an iron on the appropriate heat setting for your fabric type. This step, often overlooked, makes a significant difference in achieving a "trace-free" finish.

Expert Tips for Best Results & Avoiding Damage

Drawing from a background in practical troubleshooting, Mason shares these insights for optimal results:

Expert Tips for Best Results & Avoiding Damage
  • Know Your Fabric: Delicate fabrics like silk, rayon, or very thin cottons require far more caution and a lighter touch than durable ones like denim, canvas, or heavy twill.
  • Patience is Key: Rushing is the quickest way to cause accidental damage. Take your time, especially on intricate or dense areas. Let the tool do the work.
  • Work from the Back (Usually Safest): Accessing the bobbin threads from the reverse side minimizes the risk of cutting the visible front of your garment.
  • Use a Sharp Seam Ripper: A dull tool can snag, pull, or tear the fabric instead of cleanly cutting threads. Replace your blade or tool if it feels ineffective.
  • Small Sections, Big Difference: Don't try to rip out long sections of stitches at once. Work in short, controlled bursts.
  • Avoid Excessive Force: If a thread isn't cutting or pulling easily, reassess your technique rather than applying more pressure.

How to Remove Embroidery from Fabric: Specific Considerations

While the general steps above apply, certain fabric types present unique challenges and require extra care.

How to Remove Embroidery from a Bag

Removing embroidery from a bag often involves navigating multiple layers and stiffer materials.

  • Check the Lining: If the bag is lined, you might need to carefully open a seam in the lining to access the back of the embroidery, especially if it's densely stitched or secured with stabilizer.
  • Stiffer Fabrics: Bag materials like canvas, denim, or even thick synthetic fabrics can be more forgiving of slight snags, but also harder to smooth out completely if indentations remain. Steam and firm pressing are essential here.
  • Awkward Angles: The three-dimensional nature of a bag means you'll likely be working at awkward angles. Ensure the area you're working on is as flat and stable as possible.

How to Remove Embroidery from Leather

Removing embroidery from leather is perhaps the most challenging and highest-risk scenario. As Mason emphasizes when dealing with sensitive materials, precise execution is paramount, and sometimes, removal isn't the best option.

  • Leather is Unforgiving: Unlike woven fabric that can "heal" or relax, once a needle pierces leather, it creates a permanent hole. Removing stitches means those tiny holes will remain.
  • Extreme Caution with Tools: Use a very fine-point seam ripper and work incredibly slowly. Only snip the threads; never let the blade touch the leather itself.
  • Ghosting and Holes: Expect small holes to be visible where the stitches once were. The "ghosting" or indentation will also be more prominent and harder to remove on leather.
  • Conditioning Post-Removal: After removing the threads, you may need to apply a leather conditioner to the area to help soften it and potentially minimize the appearance of the holes. Sometimes a leather filler can be used, but this requires specialized skills.
How to Remove Embroidery from Fabric Specific Considerations

Troubleshooting Common Issues

Even with the best preparation, challenges can arise. Here’s how to tackle some common problems, echoing Mason's expertise in technical troubleshooting:

  • Stubborn, Dense Stitches: For heavily embroidered areas, focus on snipping the bobbin threads more frequently in smaller sections. You might need to gently "score" the top threads with your seam ripper (without touching the fabric) to break their hold, then pull them out.
  • Minor Fabric Snags/Holes: If you accidentally snip a tiny piece of the base fabric or create a small snag, stop immediately. For snags, gently push the errant threads back into place with a needle. For small holes, carefully mend them with a very fine thread that matches the fabric, or consider a small patch.
  • "Ghosting" or Indentations Remaining: After steaming and pressing, if a faint outline of the design persists, try repeating the steam-and-press process. For very stubborn ghosting, it might be permanent. Consider covering the area with a new patch or a different embellishment.
  • Thread Color Staining: Rarely, a vibrant embroidery thread might "bleed" its color into the fabric, especially if the item was previously washed or exposed to moisture. Treat this like any fabric stain, using appropriate stain removers for the fabric type.

When NOT to Remove Embroidery (and Alternative Solutions)

Sometimes, the risk outweighs the reward. Knowing when to stop, as Mason advises, is a crucial part of any DIY decision.

  • Extremely Delicate or Vintage Fabrics: The risk of irreparable damage (tears, runs, permanent holes) may be too high.
  • Highly Intricate, Dense, or Very Small Stitching: This can be excessively time-consuming, frustrating, and still very risky, potentially causing more damage than good.
  • Already Damaged Fabric: If the fabric around the embroidery is already worn, thin, or damaged, removal might worsen existing flaws.

Alternative Solutions:

  • Covering the embroidery: Use a decorative patch, a new embroidered design, or even a strategically placed appliqué.
  • Strategically altering the garment: If the embroidery is on a pocket, perhaps remove the pocket entirely. If it's on a sleeve, consider shortening the sleeve.
  • Dyeing the fabric: Dyeing the entire garment a darker color can sometimes camouflage the existing design, making it less noticeable.
  • Embracing the existing embroidery: Sometimes, a unique or "flawed" design can become a part of a new, eclectic style.
When NOT to Remove Embroidery (and Alternative Solutions)

Conclusion

Removing embroidery can initially seem like a daunting task, but as Mason Ellis Grant frequently highlights in his instructional guides, with the right tools, a clear methodology, and a good deal of patience, it's a completely manageable and rewarding DIY skill. You have the power to rescue cherished garments, correct past mistakes, or transform items to fit your evolving style.

Don't be afraid to give it a try – you might just discover a new appreciation for the transformative power of a seam ripper and a steady hand! For more in-depth guides and practical tips on tackling various DIY challenges, continue exploring our expert-backed content. Looking for a new project after your successful removal? Check out our beginner's guide to embroidery [Link].

Frequently Asked Questions

Loading...