-da0801079a650a2e.jpeg)
17 Year Anniversary Quotes: 110+ Funny, Romantic & Furniture Wishes (2026)
Mar, 12 2026
Create a handmade heart shaped gift box that looks professionally crafted. This beginner-friendly tutorial walks you through materials, measurements, and decoration ideas for Valentine's Day, anniversaries, and beyond.
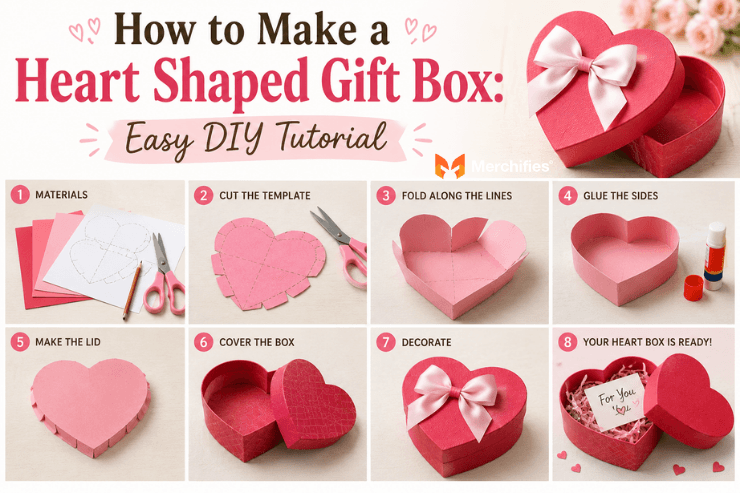
Making a heart shaped gift box from scratch takes about 45 minutes and requires only cardstock, basic tools, and a willingness to fold precisely. The process itself is straightforward once you understand the geometry: two identical hearts form the top and bottom, while scored strips curve around the perimeter to create depth. What separates a gift box that impresses from one that disappoints comes down to paper weight, accurate measurements, and patience during assembly.
As of 2026, handmade packaging has become a practical choice for gift-givers who want presentation that matches the thought behind their presents. A DIY heart box offers something store-bought versions cannot: exact sizing for your specific gift, custom colors that coordinate with the occasion, and the undeniable charm of something made by hand.
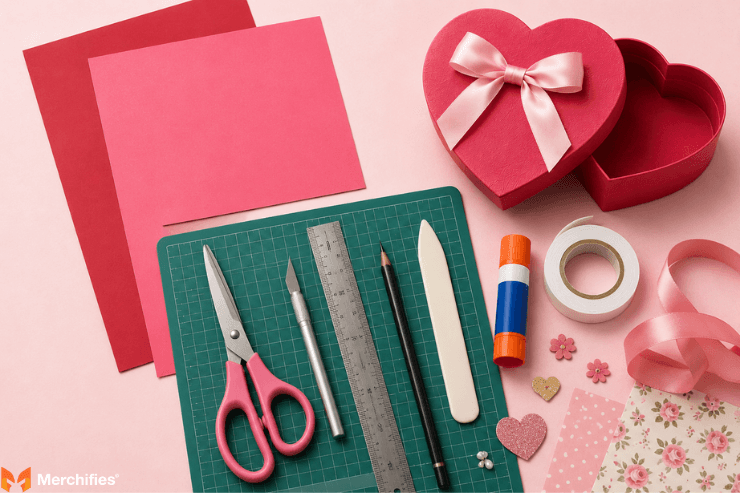
Quick overview of what you need to succeed:
The right cardstock weight determines whether your finished box holds its shape or buckles under minimal pressure. Aim for 65-110 lb cardstock — this range provides enough stiffness for structural integrity while remaining easy to fold and cut. Standard printer paper at 20 lb weight will disappoint you every time.
Gather these supplies before you start:
These recommendations come from testing multiple paper weights and adhesives to find what actually holds up during gift-giving. The honest trade-off: if you want a box that survives being handled multiple times, you need heavier cardstock, but heavier cardstock requires more precise scoring to avoid cracked folds.
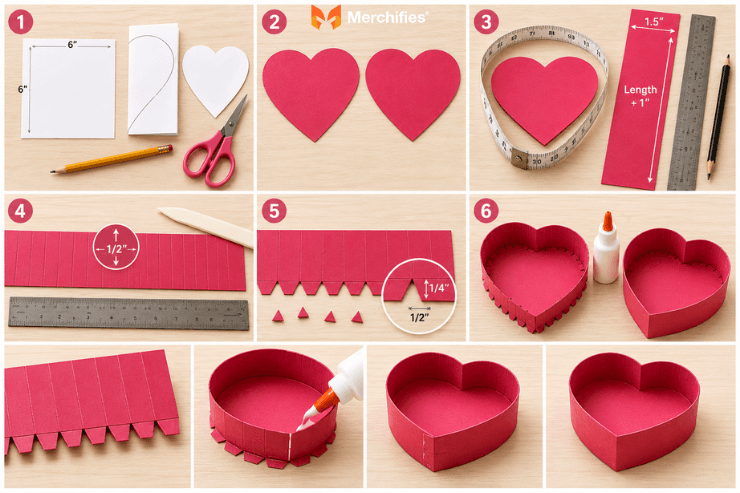
Building the base requires careful attention to your heart template and side strip measurements. Rush through either step and you will end up with a lopsided box that does not close properly.
Expect this phase to take 20-30 minutes if you measure carefully. The scored lines make curving around the heart's rounded top and pointed bottom manageable — without them, the cardstock buckles and creates uneven sides.
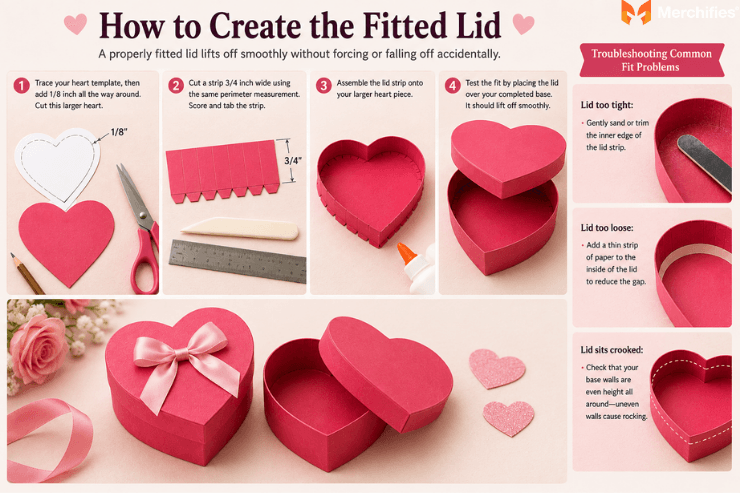
A properly fitted lid lifts off smoothly without forcing or falling off accidentally. The secret is adding a small margin to your lid heart and using a shorter side strip than the base.
Start by tracing your original heart template, then add 1/8 inch all the way around. This slight size increase provides the clearance needed for the lid to slip over the base. Cut this larger heart — it becomes your lid top.
For the lid strip, cut a piece 3/4 inch wide (compared to the base's 1.5 inch strip) using the same perimeter measurement. Score and tab this strip following the same technique as the base.
Assemble the lid strip onto your larger heart piece. Before the glue sets completely, test the fit by placing the lid over your completed base. The lid should drop on with minimal resistance and lift off cleanly.
Troubleshooting common fit problems:
The right finishing touches transform a basic heart box into a gift that matches the moment. Merchifies carries custom gift packaging in specialty finishes that complement handmade projects when you want coordinated accessories.
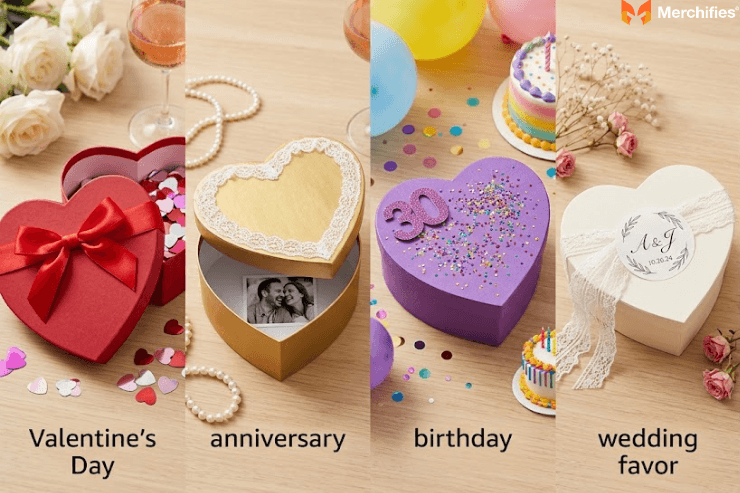
Valentine's Day: Red or deep pink cardstock forms the classic base. Add a satin ribbon bow centered on the lid and scatter heart-shaped confetti inside before placing the gift.
Anniversary: Metallic gold or silver paper elevates the presentation. Consider printing a small photo and gluing it inside the lid for a personal touch the recipient discovers when opening.
Birthday: Match the box to the recipient's favorite colors. Add their age as a small number embellishment, or use glitter cardstock for extra celebration energy.
Wedding favors: White or ivory cardstock keeps things elegant. Wrap a piece of lace around the box or add a custom monogram sticker with the couple's initials and date.
General gifting: Kraft paper cardstock creates a rustic aesthetic. Top with dried flowers, a sprig of greenery, or simple twine for an organic look.
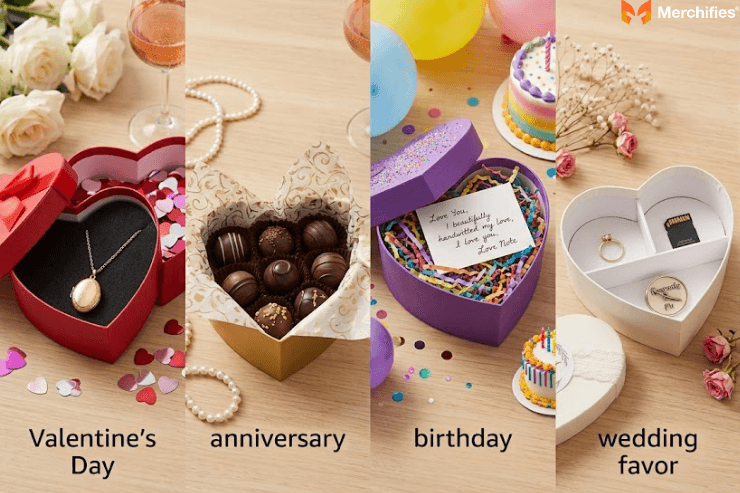
The box you have built works best when the contents fit properly and look intentional when opened. Presentation inside matters as much as the exterior.
For jewelry, add a small piece of cotton batting or felt cut to fit the bottom. This cushions the piece and creates a professional jewelry-box feel.
When gifting chocolates or treats, line the interior with food-safe tissue paper or parchment. This creates a barrier between the cardstock and food while adding a layer of anticipation.
Love notes or photos benefit from layering. Place decorative paper shred in the bottom, then nestle your note so the recipient discovers it as they dig through.
For small keepsakes, measure your item before building the box. Add 1/2 inch clearance on all sides to the item's dimensions, then scale your heart template accordingly.
Creating multiple compartments requires only small cardstock dividers cut to the interior height and glued in place. This works especially well for gifting several small items together.
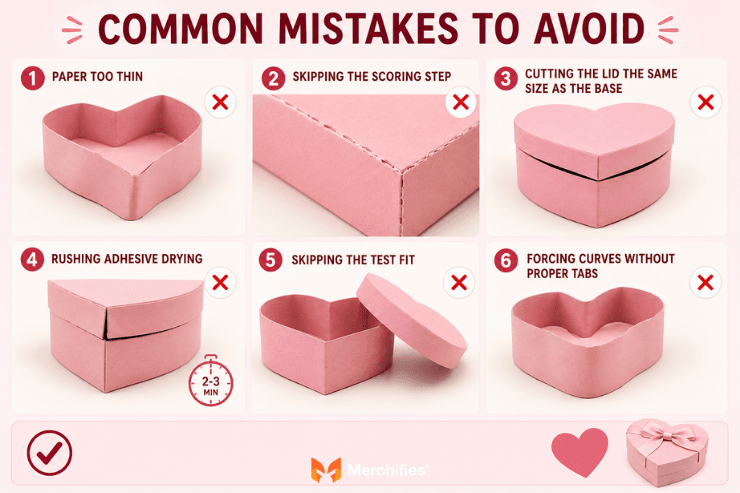
Most heart box failures happen during three critical moments: paper selection, scoring, and lid sizing. Knowing what goes wrong helps you sidestep frustration.
Paper too thin: Anything under 65 lb cardstock creates a floppy box that cannot support contents. This is the most common mistake beginners make.
Skipping the scoring step: Folding cardstock without scoring first creates cracked, ragged creases that look unprofessional and weaken the structure.
Cutting the lid the same size as the base: This seems logical but creates a lid that cannot fit over the base walls. Always add that 1/8 inch margin.
Rushing adhesive drying: Moving the box before glue sets causes shifting and visible gaps at seams. Give each section 2-3 minutes before proceeding.
Skipping the test fit: Once everything is glued, fixing fit problems becomes difficult. Always test lid fit before final assembly.
Forcing curves without proper tabs: Trying to bend a straight strip around a curve without scored lines and tabs creates buckled, uneven walls.
DIY makes sense when you have time and enjoy crafting — but several situations make purchasing the smarter choice.
Time constraints change the calculation quickly. If you need boxes for an event happening this weekend, making even three or four by hand becomes stressful rather than enjoyable.
Quantity needs matter significantly. Crafting one heart box is a pleasant project; making ten for party favors becomes a marathon that consumes entire evenings.
Professional finish requirements favor purchased boxes. Hand-cut edges and hand-folded seams, no matter how careful, look handmade. For formal occasions like weddings where uniformity matters, manufactured boxes deliver consistent results.
Premium materials are difficult to replicate at home. Velvet-covered boxes, rigid chipboard construction, or custom-printed designs require equipment and materials beyond typical craft supplies.
When the gift is the focus: Sometimes you want the box to complement rather than compete with what is inside. A beautifully made purchased box lets the contents take center stage.
Browse Merchifies heart-shaped gift boxes — including velvet finishes, clear-lid designs, and nesting sets — to find ready-made options when the occasion calls for professional presentation or when you need multiple boxes quickly.
-d4c38c342cdf20ca.jpeg)


-b555fcc6b204c456.jpeg)


