-da0801079a650a2e.jpeg)
17 Year Anniversary Quotes: 110+ Funny, Romantic & Furniture Wishes (2026)
Mar, 12 2026
A DIY fall wreath is a simple yet beautiful way to welcome the season and add a cozy touch to your front door. With warm colors, natural elements, and creative designs, you can create a wreath that perfectly reflects autumn’s charm. In this guide to DIY fall wreaths, you’ll find easy tutorials and inspiration for crafting your own seasonal décor. From rustic leaves and pumpkins to elegant minimalist styles, these ideas are perfect for beginners and seasoned crafters alike—helping you create a welcoming autumn look for your home.

Welcome the crisp air and vibrant colors of autumn by crafting your very own DIY fall wreath! This rewarding project allows you to infuse your unique personality into your home decor, often at a fraction of the cost of store-bought alternatives. Whether you're a seasoned crafter or picking up a glue gun for the first time, this comprehensive guide will walk you through everything you need to know – from selecting the perfect materials to mastering the techniques for crafting a stunning, personalized autumn statement piece for your front door. Get ready to transform your entryway with a beautiful, handmade *DIY fall wreath that truly captures the spirit of the season.
Crafting your own DIY fall wreath offers a unique blend of personal satisfaction and unparalleled aesthetic appeal. Instead of settling for generic, mass-produced options, you gain the creative freedom to design a piece that perfectly reflects your home's unique style and your personal taste. This bespoke approach matters because a handmade wreath tells a story, offering a warmer, more inviting welcome to guests than any off-the-shelf item ever could. Beyond the visual appeal, DIY projects, especially for home decor, provide an incredible sense of accomplishment. I’ve personally witnessed the pride in countless friends, like Sarah who crafted a stunning oak leaf and berry wreath for her porch last October, light up every time someone compliments their beautiful creation. Furthermore, making your own autumn wreath allows for complete customization. You can effortlessly match specific color palettes, incorporate sentimental elements, or even adapt it to a unique theme, like a "Harvest Moon" wreath (a popular 2023 trend) featuring muted silvers and deep purples alongside traditional oranges. It's truly an opportunity to engage your creativity and bring a uniquely individual touch to your seasonal displays, making your front door decor authentically yours.
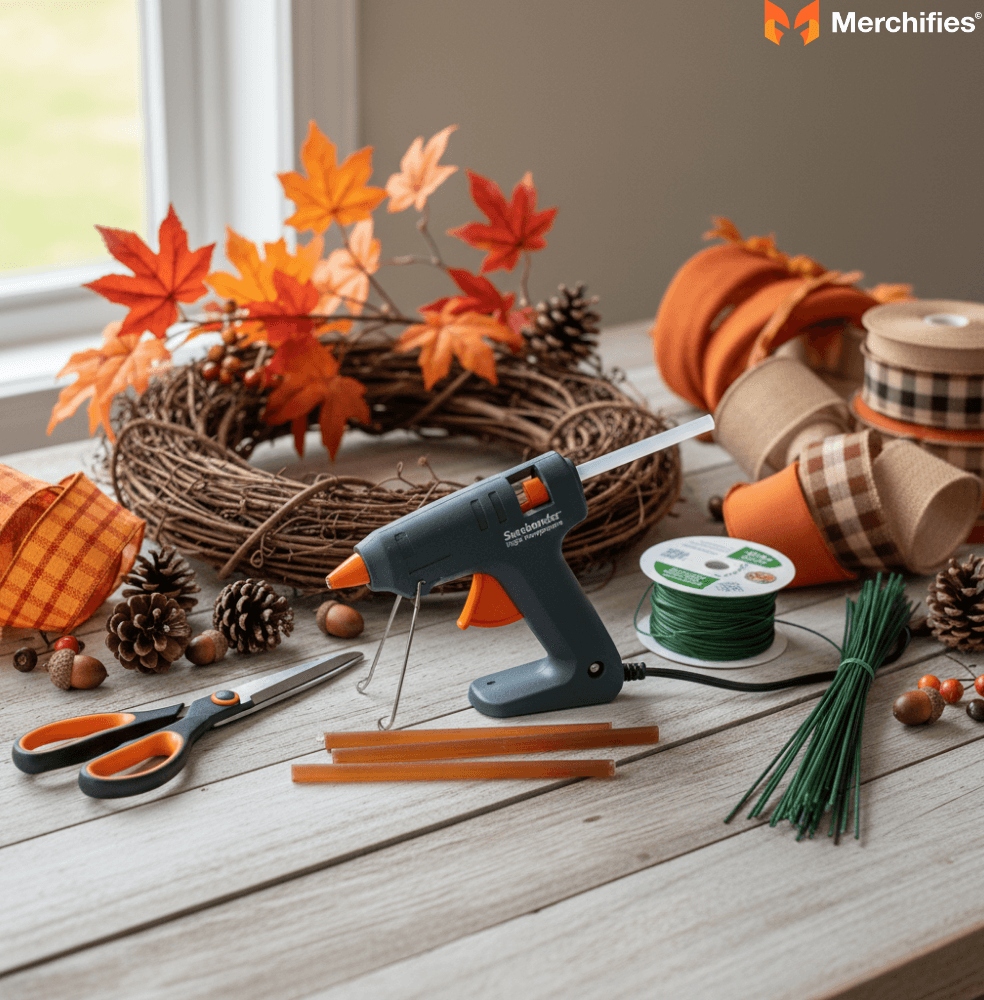
Before you dive into the creative process, gathering the right tools and materials is crucial for a smooth and enjoyable wreath-making experience. Having everything on hand prevents frustrating interruptions and ensures your project flows seamlessly from start to finish. This preparation is a small investment that pays off in both efficiency and the superior quality of your finished DIY fall wreath.
A well-equipped workspace is the foundation of any successful DIY project. For fall wreath making, a few key tools will make all the difference in achieving a professional finish and securely attaching your decorative elements.
Hot Glue Gun and Glue Sticks: This is arguably the most essential tool. A good quality hot glue gun, like the Surebonder brand's high-temp model, provides a strong, quick bond for a variety of materials. Always have plenty of glue sticks on hand.
Floral Wire (Paddle Wire & Stem Wire): Floral wire, particularly 22- or 24-gauge paddle wire, is indispensable for securing heavier elements like pinecones or bundles of leaves to your wreath base. Stem wire (18- or 20-gauge) is useful for extending or reinforcing faux stems.
Wire Cutters: Necessary for cutting floral wire cleanly and efficiently. A pair of sturdy craft wire cutters will save your scissors from damage.
Scissors: Good sharp scissors are vital for cutting ribbons, fabric, and lighter faux foliage. Keep a dedicated pair for crafts to maintain their sharpness.
Pliers (Needle-Nose): Helpful for bending and twisting floral wire, especially in tight spaces or when working with small elements.
Craft Mat or Old Newspaper: Protect your work surface from glue drips and stray glitter.
Gloves (Optional): If working with natural, prickly, or messy elements, gloves can protect your hands.
The wreath base is the skeleton of your creation, providing the structure upon which all your decorative elements will be built. Selecting the right base is paramount, as it profoundly influences the overall look, feel, and weight of your finished DIY fall wreath.
Grapevine Wreaths: These are a classic for a reason. Made from natural vines woven together, grapevine wreaths offer a rustic, organic texture that's perfect for fall. They're incredibly versatile, allowing you to tuck elements directly into the vines or secure them with wire and glue. Their open structure also makes them lighter. My personal take: while slightly messier to work with due to stray twigs, the natural charm of a grapevine base (like the 18-inch Darice models) is unmatched for a truly autumnal feel.
Straw Wreaths: Affordable and sturdy, straw bases are excellent for projects where you plan to fully cover the base. They're great for pinning elements directly into them, but be aware they can shed a bit.
Foam Wreaths: Lightweight and easy to work with, foam bases (often green or white) are ideal for projects that require a lot of gluing or for creating a very full, dense look. They come in various shapes, including traditional rings and flatter forms for more modern designs.
Metal Wreath Forms: These provide a very sturdy framework. They're often used for attaching mesh, fabric strips, or large amounts of greenery with floral wire, offering a durable option for outdoor use.
Embroidery Hoops: For a minimalist or modern easy autumn wreath, a single or double wooden embroidery hoop can serve as a chic, understated base, leaving much of the hoop exposed for a contemporary aesthetic.

Faux materials have come a long way. High-quality artificial foliage and embellishments are key to creating a beautiful and long-lasting **easy fall wreath** that can be enjoyed year after year, offering excellent value and convenience.
Faux Leaves & Greenery: Look for leaves with realistic color variations, veining, and texture. Options include maple, oak, and aspen leaves in shades of red, orange, gold, and deep burgundy. Good quality faux eucalyptus or dusty miller can also add depth. My strong opinion here: skimping on faux foliage quality is a common mistake. A cheap, plasticky leaf from a dollar store (e.g., the bright orange leaves often found in bulk packs) will instantly downgrade your wreath's appearance. Invest in realistic-looking stems from craft stores like Hobby Lobby or Michaels during their 50% off sales for a truly elevated look.
Faux Berries: Clusters of faux berries in cranberry, orange, or deep red add pops of color and texture.
Mini Pumpkins & Gourds: Small foam or plastic pumpkins and gourds are iconic fall elements that can be easily glued onto your wreath.
Acorns & Pinecones: Faux versions are readily available and durable, though natural ones (properly cleaned and dried) work beautifully too.
Sunflowers & Mums: These classic fall blooms can serve as focal points or filler.
Cotton Stems: For a rustic or farmhouse vibe, faux cotton stems add soft texture and a touch of white.

Incorporating natural and foraged elements adds an authentic, organic touch that truly captures the essence of autumn. This approach allows you to connect with nature and bring unique textures, organic beauty, and subtle scents to your **DIY autumn door wreath**.
Dried Leaves: Collect colorful leaves from your yard (maple, oak are great). Press them flat for a few days between heavy books before using, or preserve them with glycerin for flexibility.
Pinecones: Gather various sizes. Bake them on a low temperature (around 200°F for 30-60 minutes) to kill any bugs and open them fully.
Acorns & Seed Pods: Collect these from local trees. Again, bake them to ensure they're bug-free.
Dried Flowers & Grasses: Think dried hydrangeas, wheat stalks, or ornamental grasses like pampas grass for texture.
Small Branches & Twigs: Add structural interest.
Cinnamon Sticks: Not only do they look rustic, but they also provide a wonderful fall scent.
Dried Orange Slices: These add a beautiful, fragrant, and vibrant touch.
Real Berries (e.g., bittersweet, rosehips): Use with caution, as they can be messy or attract pests. They are best for temporary displays.
An editorial take: While natural elements offer unparalleled authenticity, they come with a trade-off: longevity. A wreath made purely of fresh-cut leaves and berries, like the stunning but ephemeral "Forest Harvest" wreath I saw at a local craft fair, will only last a week or two before wilting. For a front door wreath meant to last the entire season, I find a thoughtful blend of preserved natural items (like baked pinecones) with high-quality faux elements (like sturdy faux berries) strikes the perfect balance between charm and durability.

Ribbon is the ultimate finishing touch, adding color, elegance, or rustic charm to your **DIY fall wreath for front door**. It can define your wreath's style and provide a perfect hanging mechanism.
Wired Ribbon: This is your best friend for bows. Wired ribbon (e.g., 2.5-inch wide burlap, plaid, or solid velvet) holds its shape beautifully, allowing you to create full, professional-looking bows.
Burlap Ribbon: Excellent for farmhouse, rustic, or natural themes.
Plaid Ribbon: A classic fall pattern that adds warmth and tradition.
Velvet Ribbon: For a touch of luxury and richness.
Twine or Jute: For a very natural, understated hanging loop.
Small Signage: A small wooden "Welcome" or "Autumn" sign can be a charming addition.
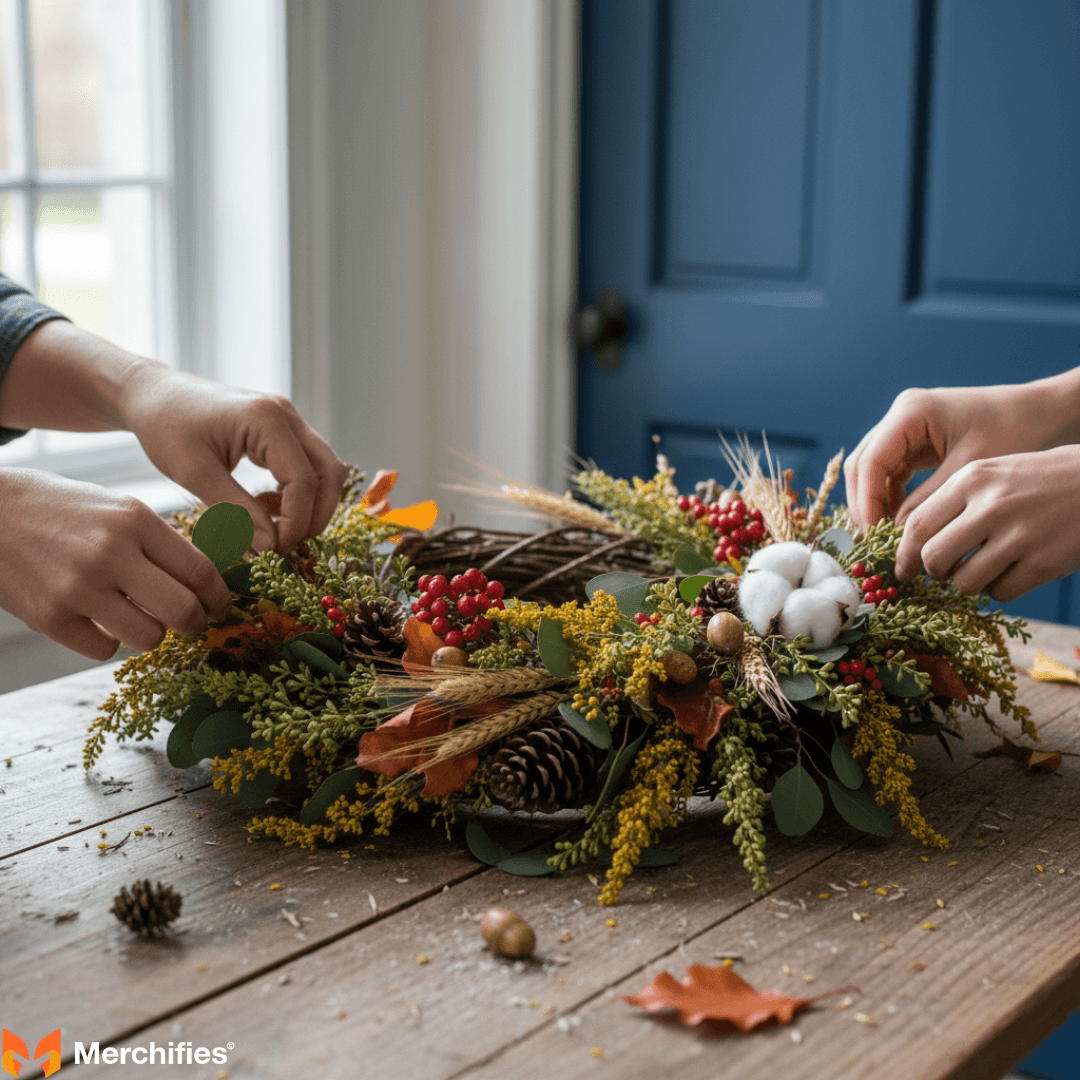
Creating a beautiful fall wreath is more straightforward than you might think, especially when you break it down into manageable steps. This tutorial will guide you through the process of assembling a versatile and attractive **DIY fall wreath**, providing a solid foundation for endless customization and creative expression.
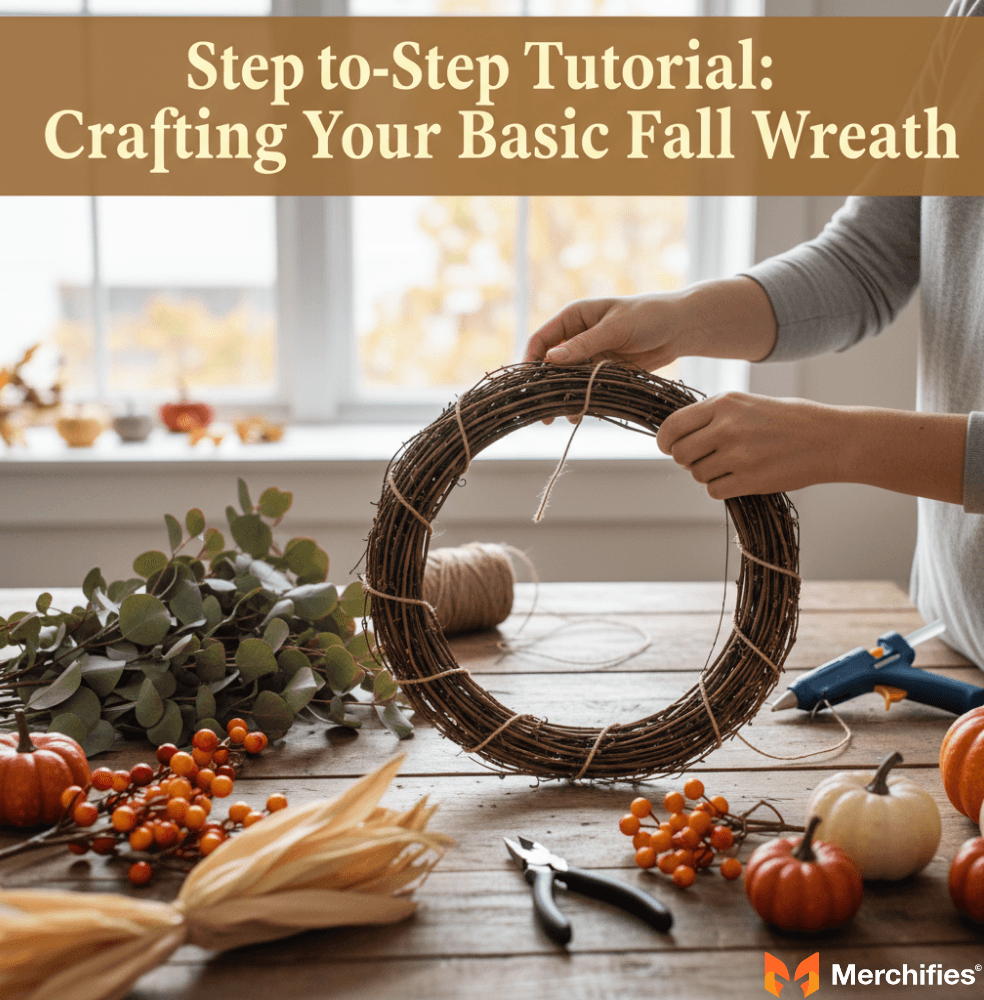
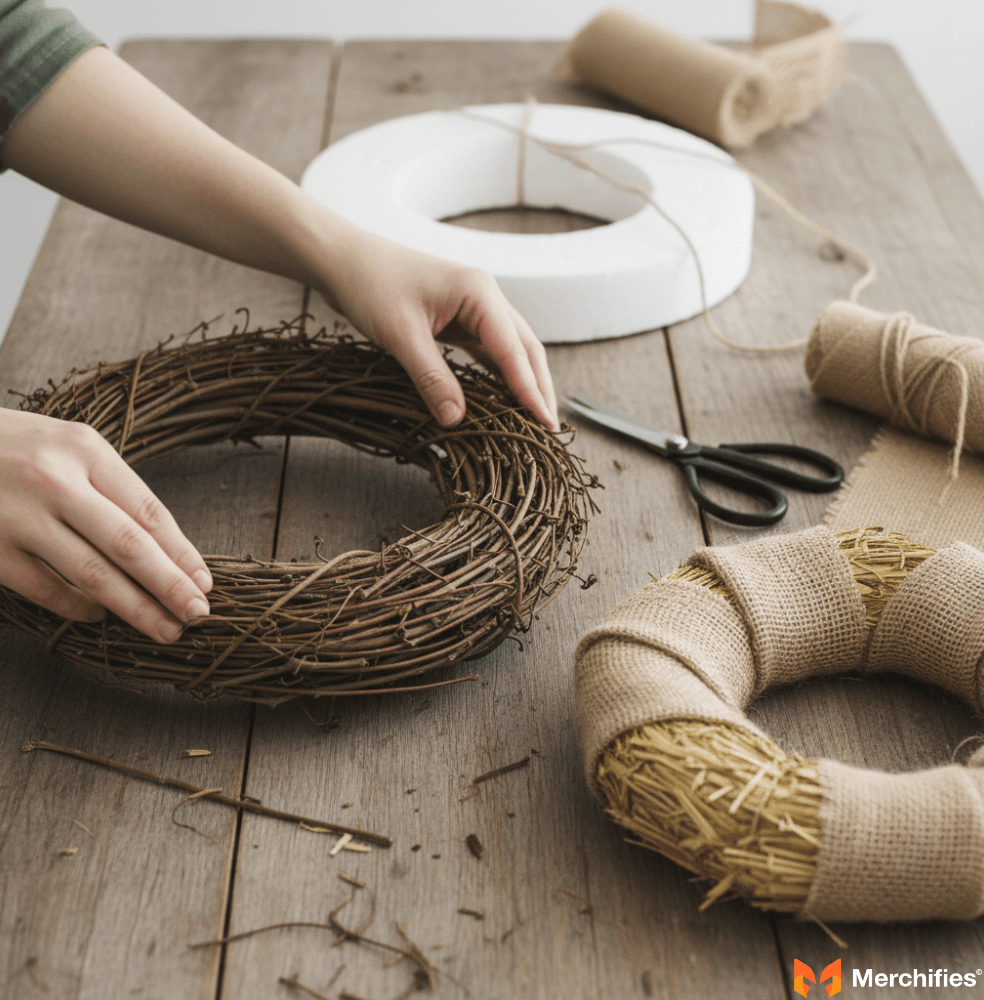
The first step is to get your wreath base ready, which often involves a bit of cleaning or shaping to ensure a smooth canvas for your decorations.
For Grapevine Wreaths: Gently remove any loose twigs or excessive debris. If you want a slightly different shape, you can carefully bend the vines a little, but be gentle to avoid breakage.
For Foam or Straw Wreaths: Ensure the surface is clean and smooth. If using a straw wreath, you might want to wrap it in burlap or fabric if any part of the base will show through your design, to prevent shedding.
Create a Hanging Loop: If your base doesn't have an obvious top, decide which side will be the top. Attach a loop of floral wire or sturdy twine to the back of the wreath form for hanging. This small step now saves a lot of hassle later.
Establishing a lush, textured foundation of greenery is crucial for giving your wreath a full and professional appearance. This initial layer creates depth and provides a backdrop for your focal elements.
Start with Larger Stems: Begin by inserting or gluing your largest faux greenery stems around the wreath base. Think of this as creating the main "flow" of your wreath. For a circular wreath, I often aim for an arc or a full circle, making sure the stems are pointing in the same general direction.
Layer and Overlap: Don't lay everything flat. Overlap stems slightly and vary their angles to create dimension. Secure them firmly with hot glue or by tucking them into the grapevine. I often use 2-3 dabs of hot glue per stem (e.g., on a 20-inch wreath base) to ensure it holds up to door slams and wind.
Use Different Textures: Combine different types of greenery, like broad maple leaves with feathery eucalyptus, to add visual interest. This thoughtful layering is what makes a **DIY fall wreath** look truly professional and inviting.
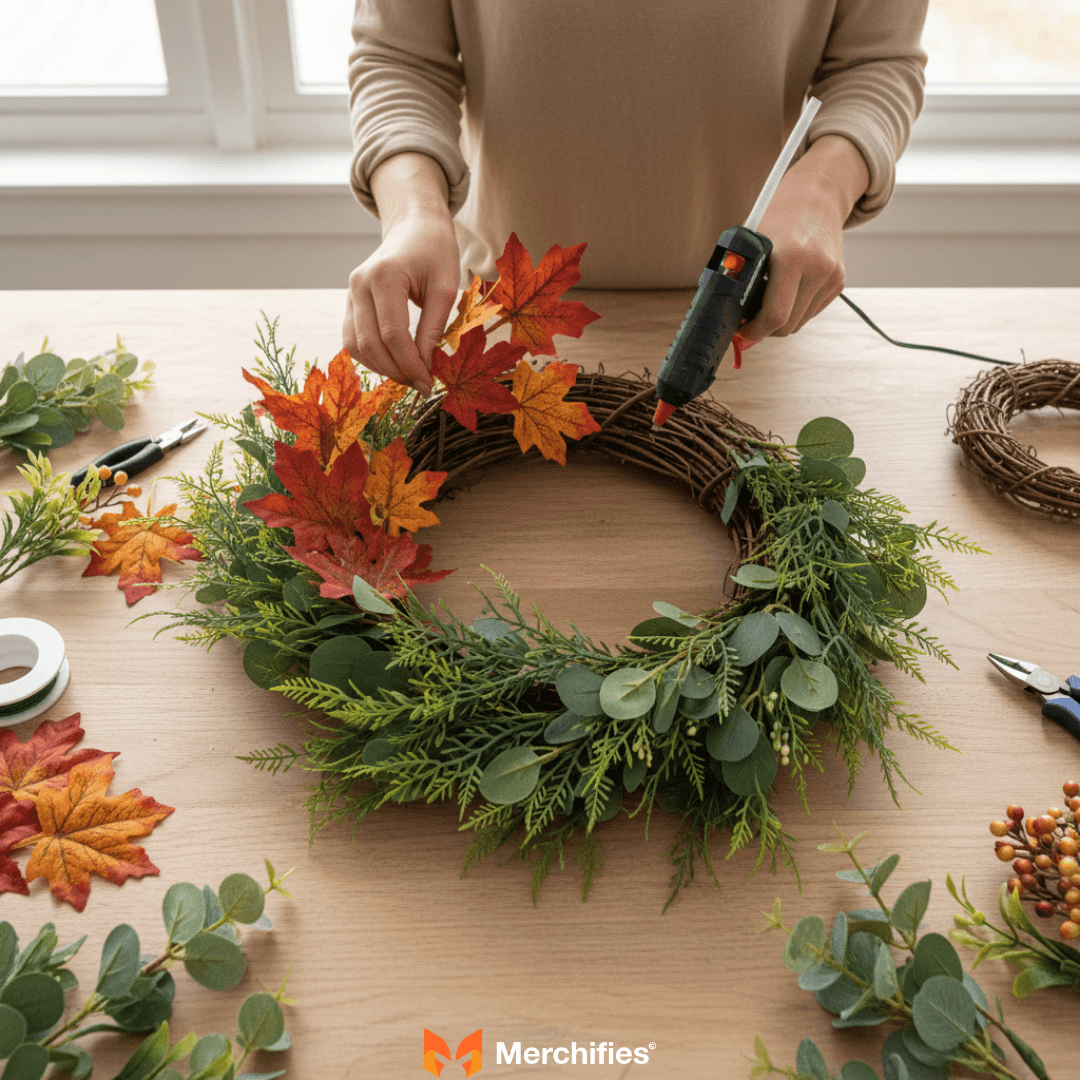
Once your greenery foundation is in place, it’s time to introduce the stars of your wreath – the main decorative elements and any focal points you envision. These are the pieces that will immediately draw the eye.
Place Focal Points First: If you have a large pumpkin, a prominent sunflower, or a decorative sign, position it first. Decide if you want it centered, off-center, or at the bottom.
Distribute Main Elements: Arrange larger elements like clusters of berries, substantial pinecones, or larger faux flowers around your focal point or evenly throughout the wreath. Step back frequently to assess balance and symmetry. For example, if you're making a pumpkin-themed **DIY fall door wreath**, place your largest pumpkin first, then meticulously arrange smaller pumpkins or gourds around it, ensuring a harmonious visual weight distribution.
Secure Firmly: Use ample hot glue. For heavier items like large pinecones, I often wrap floral wire around their base and then twist the wire securely around the wreath form before adding glue. This provides a dual layer of security.

With your main elements in place, the next step is to fill in any gaps and add layers of texture, which gives your wreath a rich, finished look. This is where the magic of "fullness" happens.
Smaller Elements & Berries: Tuck in smaller sprigs of leaves, tiny berry clusters, or individual acorns into any bare spots.
Vary Textures: Use elements like dried wheat stalks, cotton bolls, or smaller pinecones to introduce different textures. This contrast prevents the wreath from looking flat.
Work from the Outside In: Often, it's effective to add filler around the outer edges and then work your way towards the center, ensuring a consistent density.
Opinionated Take: Many DIYers stop too soon, leaving their wreaths looking sparse. A truly professional-looking **DIY wreath for front door fall** needs generous filler. Don't be afraid to keep adding small sprigs and berries until there are no obvious "holes." It's better to have a slightly overflowing wreath than one that looks like it's missing something.
A well-made bow can elevate your wreath from pretty to absolutely stunning, serving as a classic focal point or an elegant accent. This step is optional but highly recommended for adding that final flourish.
Choose Your Ribbon: Wired ribbon is best for holding shape. Select a color and pattern that complements your wreath (e.g., a buffalo check for rustic, a solid velvet for elegant).
Make Your Bow: There are many tutorials online for various bow styles (e.g., a simple loop bow, a classic multi-loop bow, or a designer bow). For a basic multi-loop bow, create several loops, gathering them in the center, and secure tightly with floral wire. Leave long tails if desired.
Attach the Bow: Use the floral wire from your bow (or a separate piece) to securely attach it to your wreath base. Position it at the top, bottom, or off to one side – wherever it looks best. Ensure it's firmly attached so it doesn't flop.

The final stage is all about refining your creation and ensuring it's ready to proudly adorn your front door. This attention to detail makes all the difference.
Inspect Thoroughly: Hold your wreath up and examine it from all angles. Look for any exposed glue, loose elements, or areas that look sparse. Add more filler or glue as needed.
Trim Excess: Snip off any stray hot glue strings, visible floral wire ends, or unruly faux stems.
Fluff and Arrange: Gently fluff any leaves, berries, or bow loops to ensure they are positioned optimally and look natural.
Add a Hanger: If you haven't already, attach a sturdy loop of floral wire, twine, or ribbon to the back for hanging. This is critical for proudly displaying your beautiful easy do-it-yourself fall wreath.

Once you've mastered the basics, the possibilities for creating unique DIY autumn door wreath are truly endless. Here are some inspiring ideas, catering to a range of aesthetics and crafting abilities, to spark your imagination and help you design the perfect piece for your home.
Rustic and farmhouse styles are incredibly popular for fall, evoking a sense of warmth, tradition, and cozy comfort. These wreaths often feature natural textures and earthy tones.
Burlap & Cotton Wreath (2022 Trend): Start with a grapevine base. Weave in strips of natural burlap ribbon. Add clusters of faux cotton bolls, small cream-colored berries, and a few preserved oak leaves. Finish with a large, multi-loop burlap bow.
Wheat & Lavender Wreath: A simple metal hoop or grapevine base adorned with bundles of dried wheat stalks, interspersed with dried lavender sprigs for a touch of unexpected color and fragrance. This creates a beautifully minimalist yet rustic look.
Mason Jar Lid Wreath: A unique take using painted mason jar lids (e.g., distressed white or metallic copper) hot-glued onto a foam base, then embellished with tiny faux pumpkins and a plaid bow. This particular style, while charming, can be heavier, so ensure your hanging mechanism is robust.
For those who prefer a more refined, understated approach, elegant and modern minimalist wreaths offer sophistication without sacrificing autumnal spirit. These designs often focus on clean lines, limited color palettes, and quality materials.
Single Statement Leaf Wreath: Use a simple gold or black metal hoop as the base. Attach a single, oversized, high-quality faux maple leaf (e.g., a deep burgundy or burnt orange) slightly off-center. Add one or two small, subtle faux berries for a delicate pop of color.
Geometric Wreath with Pampas Grass (2023 Trend): A modern geometric metal frame (square, hexagonal) adorned with a small cluster of dried pampas grass, a few bleached pinecones, and perhaps a single white faux pumpkin. The key is negative space.
Monochromatic Berry Wreath: A grapevine wreath completely covered in faux berries of a single color, like deep cranberry or muted orange, for a sophisticated, uniform look. This works best with different sizes of berries to add texture.
Embrace the raw beauty of the outdoors with wreaths made primarily from elements gathered from nature. These designs celebrate the textures and colors found in forests and fields during autumn.
Pinecone & Acorn Abundance Wreath: A sturdy grapevine base heavily adorned with a variety of baked pinecones (different sizes and shapes), acorns, and small twigs. You can add a few sprigs of preserved fall leaves for color.
Dried Orange & Cinnamon Stick Wreath: Attach dried orange slices (made by baking thin orange slices until dehydrated) and bundles of cinnamon sticks to a straw or foam base. Incorporate dried star anise for added detail and fragrance.
Bittersweet Vine Wreath (with caution!): For experienced foragers, a wreath made from real bittersweet vine (ensure it's not invasive in your area and handle with gloves as the berries are toxic if ingested) wrapped around a base, adorned with its distinctive orange berries. This is a classic **fall door wreath DIY** for a reason, but requires careful handling.
Sometimes you need a beautiful easy fall wreath in a flash. These ideas are perfect for busy schedules or last-minute decorating.
Ribbon Loop Wreath: Cut various fall-themed wired ribbons into 6-inch strips. Fold each strip into a loop and hot glue the ends to the back of a foam wreath form, overlapping them until the form is covered. This is surprisingly full and vibrant.
Faux Leaf Garland Wreath: Purchase a pre-made fall leaf garland. Simply wrap it around a plain metal or foam wreath form, securing the ends with floral wire or hot glue. Add a pre-made bow for instant polish.
One-Bunch Wreath: Buy a large, full "fall pick" or "bush" (a single stem with many attached leaves, berries, and small pumpkins) from a craft store. Trim the stems and arrange them all in one direction on a grapevine or foam base, securing with hot glue. It creates a stunning, asymmetrical burst of fall.
Break away from tradition with themes that offer a fresh, creative twist on autumn decor. These ideas showcase originality and personality.
Literary Harvest Wreath: Use pages from an old book (e.g., a discarded copy of "Anne of Green Gables" for a sentimental touch) rolled into cones or cut into leaf shapes, glued onto a foam base. Add small faux apples or tiny quills for embellishment.
Cozy Knit Wreath: Wrap a foam wreath form in an old cable-knit sweater or soft yarn. Embellish with wooden buttons, small felt leaves, and a faux hot cocoa mug ornament for a truly hygge vibe.
Gnome-Themed Wreath (2021-2023 Trend): Incorporate small fall-themed gnomes (often found in craft stores) into a traditional leaf and berry wreath. Give them a prominent spot, perhaps peeking out from behind a large sunflower. My take: while gnomes were incredibly popular, their ubiquity means they're losing some of their unique charm. If you use them, integrate them thoughtfully rather than just sticking them on.

Crafting a beautiful fall wreath is one thing; ensuring it lasts through the season and beyond is another. These pro tips will help you create a durable, attractive DIY fall wreath that stands the test of time and addresses common crafting challenges.
Creating a stunning fall wreath doesn't have to break the bank. With a little creativity and strategic shopping, you can achieve a high-end look on a modest budget.
Shop Sales & Clearance: The best time to buy faux floral supplies is often after a holiday or during seasonal sales (e.g., 50% off at Michaels or Hobby Lobby). Stock up on basics like grapevine wreaths and greenery.
Forage Smart: Collect pinecones, acorns, sturdy twigs, and dried leaves from your yard or local parks. Remember to clean and prepare them (e.g., baking pinecones at 200°F for 30 minutes to kill bugs and open them). This is arguably the biggest money-saver.
Dollar Store Finds (with caution): While many dollar store items can look cheap, some things like basic foam wreath forms, certain ribbons, or small filler items can be good value. The trick is to mix them with higher-quality elements.
Repurpose & Upcycle: Use old scarves for ribbon, cut fabric scraps into leaves, or paint old ornaments in fall colors. I once saw a crafter use an old orange sweater to wrap a foam wreath, then added some foraged twigs and a few faux acorns – it looked incredibly chic and cost almost nothing.
Fewer, Higher-Quality Elements: Instead of many cheap items, choose fewer, but more impactful, realistic-looking elements. A single gorgeous faux sunflower can make more of a statement than a dozen flimsy ones.
To ensure your handmade DIY fall wreath for front door remains beautiful season after season, proper care and storage are absolutely essential. Neglecting these steps can lead to fading, dust accumulation, and damage.
Protect from Elements: If your wreath is primarily faux, it can withstand some outdoor exposure. However, direct, prolonged sunlight will fade colors over time, and heavy rain can degrade glues or natural elements. Consider placing it under a porch overhang.
Gentle Cleaning: Dust your wreath periodically with a soft brush, a can of compressed air, or a hairdryer on a cool, low setting. For faux leaves, a damp cloth can gently wipe away grime.
Proper Storage: The best way to store a fall door wreath DIY is in a dedicated wreath storage box. These boxes are designed to protect the wreath's shape and keep dust at bay. Alternatively, use a large plastic garbage bag to cover it, gently stuffing the center with tissue paper or bubble wrap to maintain its form.
Cool, Dry Place: Store your wreath in a cool, dry place like a climate-controlled closet or attic. Avoid hot, humid areas (like an uninsulated garage attic) which can melt glues or encourage mold on natural elements.
Hanging your beautiful DIY fall wreath without damaging your door or frame is simple with the right tools. There are several effective and damage-free solutions available.
Over-the-Door Wreath Hangers: These are the most popular and easiest solution. They simply hook over the top of your door and have a hook on the front for your wreath. Look for options with felt pads on the back to prevent scratching. They come in various finishes (bronze, black, white).
Adhesive Hooks: For lightweight wreaths, a strong adhesive hook (like a Command Hook) can be applied to the inside of your door. Hang a long piece of ribbon over the top of the door, attaching the wreath to the ribbon on the outside and securing the ribbon to the hook on the inside. This creates a seamless look from the front.
Magnetic Wreath Hangers: If you have a metal door, magnetic wreath hangers are fantastic. They come in two parts – one magnet on the outside of the door, and one on the inside, holding the wreath securely in place without any drilling or hooks.
Suction Cups (for glass doors/windows): For very lightweight wreaths on glass, heavy-duty suction cup hooks can work, but check the weight rating and ensure the surface is clean for optimal adhesion.
Even seasoned crafters encounter hiccups. Knowing how to troubleshoot common problems can save your project and your sanity.
Wreath Looks Sparse: This is the most frequent issue. The solution is usually more filler! Go back with smaller sprigs of leaves, berries, or even extra ribbon loops. My personal rule of thumb is to keep adding until I think it's "too much," then I usually find it's just right.
Elements Keep Falling Off: This points to insufficient glue or wire. Re-attach the element using more hot glue, pressing firmly until cool. For heavier items, always reinforce with floral wire, twisting it tightly around the element and the wreath base.
Wreath is Lopsided/Unbalanced: Step back and look at your wreath from a distance. Identify the heavy side. You might need to remove some elements from one side or add more to the lighter side to achieve visual balance. Sometimes, simply adjusting the hanging point slightly can fix a minor imbalance.
Visible Glue Strings: After your glue has dried, gently pull off any fine glue strings. A hairdryer on a low, cool setting can also help to melt them away without damaging your materials.
One of the smartest ways to get more mileage out of your easy do-it-yourself fall wreath is to make it adaptable. With a few simple swaps, you can transition it from autumn to winter, or even spring.
Removable Elements: Design your wreath with a base of neutral greenery (e.g., faux eucalyptus, boxwood) that can stay year-round. Then, attach seasonal elements with floral wire rather than hot glue.
Fall to Winter: Remove pumpkins, bright orange berries, and very specific fall leaves. Add frosted pinecones, faux snow-dusted branches, red cranberries, or a festive plaid bow for winter.
Fall to Spring: Remove the deep autumn colors. Introduce pastel faux flowers (peonies, tulips), light green foliage, or a bright, cheerful spring-themed bow.
Opinionated Take: While the idea of a multi-seasonal wreath is appealing for budget and storage, it's often more successful to design a mostly adaptable base and swap out key elements. Trying to make a single wreath perfectly transition through all four seasons often results in a "generic" look that lacks the specific charm of a dedicated seasonal piece. Focus on two seasons, like fall and winter, for the most impactful transformations, making your **DIY fall wreath** truly versatile.
Wreath making can be a wonderful family activity, fostering creativity and creating lasting memories. Simple, safe projects allow even the youngest crafters to participate in making fall door wreaths DIY.
Paper Plate Wreaths: Cut out the center of a paper plate. Kids can glue on construction paper leaves, glitter, pom-poms, or pre-cut foam shapes in fall colors.
Nature Collage Wreaths: Provide a plain paper or cardboard ring. Take a nature walk to collect leaves, small twigs, feathers, and smooth pebbles. Kids can glue their treasures onto the ring.
Yarn-Wrapped Wreaths: Use a foam wreath form. Kids can wrap it with various colors of fall-toned yarn. Then, they can glue on pre-made felt shapes (pumpkins, apples) or large, easy-to-handle faux leaves.
Safety First: Always supervise children with hot glue guns (or use craft glue for younger kids). Pre-cut any sharp wires or difficult materials. The goal is fun, not perfection.

You've put in the effort, gathered your materials, and followed the steps – now it's time to admire and proudly display your beautiful, handmade DIY fall wreath. This isn't just a piece of decor; it's a reflection of your creativity and a warm invitation to all who approach your front door. Hanging your unique autumn masterpiece is the final, satisfying step in truly embracing the season. Whether it's a rustic grapevine adorned with foraged pinecones, an elegant minimalist hoop, or a vibrant burst of faux foliage, your personalized creation adds undeniable curb appeal and a touch of cozy charm. So, step back, take a moment to appreciate your handiwork, and let your magnificent DIY fall wreath proudly welcome autumn to your home.
-d4c38c342cdf20ca.jpeg)


-b555fcc6b204c456.jpeg)


