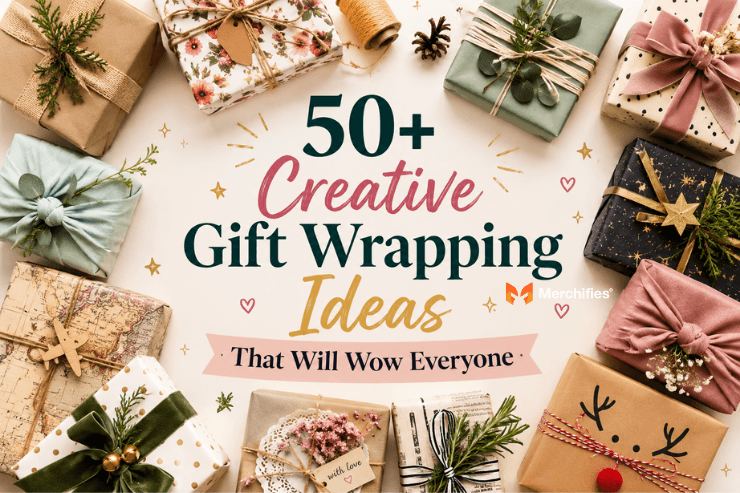
50+ Creative Gift Wrapping Ideas That Will Wow Everyone
Transform any present into a show-stopper with 50+ gift wrapping ideas organized by skill level, occasion, and budget. From quick wins anyone can master to elegant gift box techniques, find the perfect wrap for every gift.
Blog Post Contents
The difference between a forgettable gift and one that gets photographed before opening comes down to wrapping technique, not expensive materials. After testing dozens of methods across holiday seasons, birthdays, and last-minute occasions, the pattern becomes clear: simple techniques executed well beat elaborate attempts every time. Gift wrapping ideas that actually work share three traits—they use materials you can find easily, they take under five minutes, and they create visual impact from across the room.
As of summer 2026, the sustainable wrapping movement has shifted gift-giving expectations. Fabric wraps, repurposed papers, and natural embellishments now signal thoughtfulness rather than budget constraints. Whether you need gift box wrap ideas for awkward shapes or want to personalize a present for someone special, this guide organizes 50+ techniques by skill level so you can find your perfect match without endless scrolling.
Quick reference for any wrapping situation:
Beginner techniques use items already in your home
Intermediate methods add professional polish with practice
Gift box wrapping solves the most common frustration points
Budget-friendly options deliver premium looks under five dollars
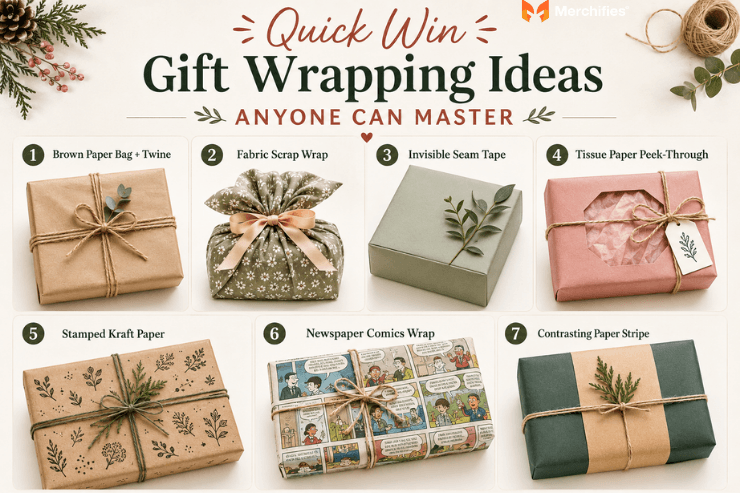
Quick Win Gift Wrapping Ideas Anyone Can Master
The fastest path to impressive gift wrapping starts with techniques that forgive imperfect folds and work with basic supplies. These seven methods require no special skills, no craft store trips, and no YouTube tutorials to execute successfully.
Quick Win Gift Wrapping Ideas Anyone Can Master
Brown paper bag with twine (Beginner): Cut a large paper grocery bag along the seams to create flat wrapping paper. Wrap your gift with the printed side facing inward for a clean kraft look, then tie with jute twine in a simple cross pattern. Materials: grocery bag, scissors, twine.
Fabric scrap wrapping (Beginner): Any fabric piece roughly three times the size of your gift works beautifully. Place the gift in the center, gather the fabric at the top, and secure with a ribbon or rubber band hidden under a decorative bow. This zero-waste option particularly suits recipients who appreciate sustainability. Materials: fabric scraps, ribbon or elastic.
Double-sided tape invisible seam technique (Beginner): The single change that makes amateur wrapping look professional is eliminating visible tape. Apply double-sided tape to the inside edge of your paper fold, creating seams that appear seamless. Materials: wrapping paper, double-sided tape.
Layered tissue paper peek-through method (Beginner): Wrap your gift in solid colored paper first. Cut a window shape in a contrasting sheet of tissue paper and layer it on top, allowing the base color to show through. The peek-through effect adds depth without complexity. Materials: wrapping paper, tissue paper, scissors, tape.
Simple kraft paper with stamp decoration (Beginner): Plain kraft paper transforms instantly with rubber stamps. Create a repeating pattern using a single stamp, or cluster different designs for organic variety. Even wine corks dipped in paint work as improvised stamps. Materials: kraft paper, stamps or improvised stamp materials, ink pad.
Newspaper comics wrap (Beginner): Sunday comic sections make cheerful wrapping paper for casual gifts. The colorful panels distract from imperfect corners, and recipients often appreciate the nostalgic touch. Materials: newspaper comics section, tape.
Solid paper with contrasting stripe (Beginner): Wrap your gift in solid paper, then cut a two-inch strip of contrasting paper to wrap around the center like a belly band. Secure with a small piece of tape on the bottom. This professional technique takes ninety seconds. Materials: two coordinating papers, tape.
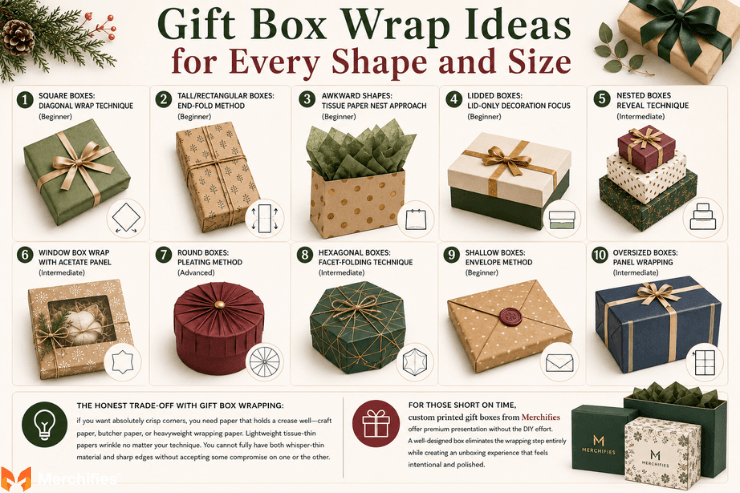
Gift Box Wrap Ideas for Every Shape and Size
Gift boxes present unique wrapping challenges because their rigid structure reveals every wrinkle and crooked fold. The techniques below solve specific box problems rather than offering generic advice that fails on non-standard shapes.
Gift Box Wrap Ideas for Every Shape and Size
Square boxes: diagonal wrap technique (Beginner): Position your square box diagonally on the wrapping paper so the corners point toward the paper edges. This orientation reduces bulk at the corners and creates cleaner folds. Fold one corner up and over, secure with tape, then repeat with the opposite corner before finishing the sides.
Tall/rectangular boxes: end-fold method (Beginner): Measure paper so the long sides have two inches of overlap on the top and bottom. Fold the long sides first, creating a seam down one side. For the ends, fold the side flaps inward like hospital corners on a bed, then fold the top flap down and bottom flap up, securing with tape hidden under the bottom flap.
Awkward shapes: tissue paper nest approach (Beginner): When a box has bumps, handles, or irregular proportions, abandon the precision approach. Line a slightly larger decorative bag or box with tissue paper, nestle the item inside, and let artfully arranged tissue paper emerge from the top.
Lidded boxes: lid-only decoration focus (Beginner): Beautiful boxes with separate lids deserve a different strategy. Wrap only the lid with paper, leaving the base visible or wrapped in a complementary solid color. Add a ribbon that wraps around just the lid, with the bow positioned slightly off-center for visual interest.
Nested boxes reveal technique (Intermediate): Wrap three progressively smaller boxes in coordinating papers. Place your gift in the smallest, then nest each box inside the next size up. Recipients unwrap multiple layers of anticipation before reaching the actual present.
Window box wrap with acetate panel (Intermediate): Cut a shape from your wrapping paper before wrapping, then tape a piece of clear acetate behind the cut-out from the inside. This creates a peek-a-boo window that hints at the gift inside without revealing everything.
Round boxes: pleating method (Advanced): Cut paper into a circle roughly four inches larger in diameter than the box in all directions. Center the box on the paper, then work around the perimeter creating small overlapping pleats, securing each with a small piece of tape or a decorative brad.
Hexagonal boxes: facet-folding technique (Intermediate): Measure enough paper to wrap the sides like a tube, plus overlap for the top and bottom. Wrap the sides first, then fold the top edges down at each facet corner, working around until you create a star pattern. Repeat on the bottom.
Shallow boxes: envelope method (Beginner): Place the box in the center of your paper, fold two opposite sides to meet in the middle, then fold the remaining sides up like closing an envelope. Secure with a wax seal or sticker at the center point.
Oversized boxes: panel wrapping (Intermediate): When your gift is too large for a single sheet, wrap each visible face as a separate panel. Cut pieces slightly larger than each face, fold edges under for clean lines, and adhere panels to the box directly. Disguise seams with ribbon running along the edges.
The honest trade-off with gift box wrapping: if you want absolutely crisp corners, you need paper that holds a crease well—craft paper, butcher paper, or heavyweight wrapping paper. Lightweight tissue-thin papers wrinkle no matter your technique. You cannot fully have both whisper-thin material and sharp edges without accepting some compromise on one or the other.
For those short on time, custom printed gift boxes from Merchifies offer premium presentation without the DIY effort. A well-designed box eliminates the wrapping step entirely while creating an unboxing experience that feels intentional and polished.
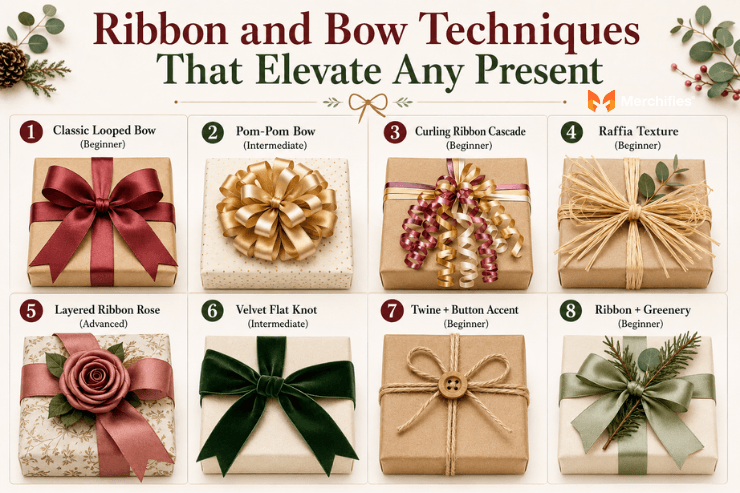
Ribbon and Bow Techniques That Elevate Any Present
A mediocre wrap with an excellent bow outperforms a perfect wrap with a sloppy ribbon every time. The bow is what recipients notice first and remember longest, making these techniques worth practicing once or twice before your next gift-giving occasion.
Ribbon and Bow Techniques That Elevate Any Present
Classic looped bow (Beginner): Cut a length of ribbon roughly three times the finished bow width. Create a loop on the right side, then a loop on the left, holding the center pinched with your fingers. Continue alternating sides, making each loop slightly smaller than the previous. Wrap a short piece of ribbon around the pinched center, secure with a knot or glue at the back, and fluff the loops.
Pom-pom bow for volume (Intermediate): Wind ribbon around a four-inch piece of cardboard approximately twenty times. Slide the wound ribbon off the cardboard, pinch the center, and tie tightly with a separate piece of ribbon. Cut the loops on both sides and fluff into a spherical pom-pom shape. Trim any uneven ends.
Curling ribbon cascade (Beginner): Cut six to eight pieces of curling ribbon in varying lengths. Hold them together and tie at the center point. Run each ribbon against a scissor blade with firm pressure to create the curl. Attach the tied center to your package. The variety in curl tightness and ribbon length creates dynamic movement.
Raffia natural texture option (Beginner): Gather eight to ten strands of raffia, wrap around your gift crossing in the center, and tie a simple knot. Separate and fan the loose ends for a fuller appearance. Raffia suits rustic, eco-friendly, or neutral wrapping themes particularly well.
Layered ribbon rose (Advanced): Using wired ribbon, fold the ribbon end down at a 45-degree angle. Roll this folded end tightly three times to form the rose center. Fold the ribbon away from you at a 45-degree angle, then roll the center toward the fold, creating a petal. Continue folding and rolling until you achieve the desired rose size. Secure the base with wire or hot glue. Merchifies carries a selection of gift presentation supplies, including decorative ribbon varieties suited to different wrapping styles.
Velvet ribbon flat knot (Intermediate): Velvet ribbon does not hold bows well due to its texture. Instead, wrap the ribbon around your package and tie a simple flat knot pulled tight. Leave moderately long tails cut at an angle. The fabric's luxurious texture makes the simple knot feel intentional rather than unfinished.
Twine and button accent (Beginner): Wrap twine around your package in a cross pattern. Thread both ends through a vintage button's holes, then tie in a small bow. This technique works especially well on kraft paper or fabric-wrapped gifts.
Ribbon with tucked greenery (Beginner): Tie your ribbon normally, then tuck a sprig of rosemary, eucalyptus, or pine beneath the knot. The greenery adds dimension and fragrance without requiring advanced skills.
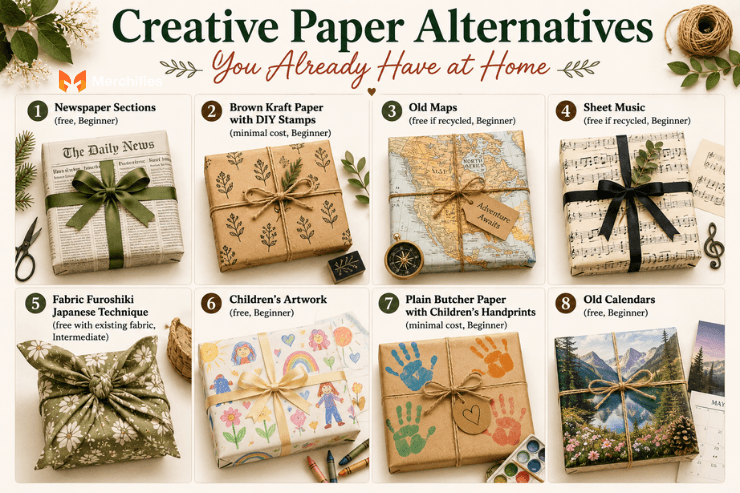
Creative Paper Alternatives You Already Have at Home
The most memorable wrapping often costs nothing because it uses materials already in your home with a story attached. These alternatives work beautifully when you have run out of traditional wrapping paper or want your presentation to feel more personal.
Creative Paper Alternatives You Already Have at Home
Newspaper sections (free, Beginner): Financial pages create sophisticated black-and-white presents. Sports sections suit athletic recipients. Sunday comics bring cheerful color. The key to newspaper wrapping looking intentional rather than cheap is committing fully—add quality ribbon and ensure your folds are crisp.
Brown kraft paper with DIY stamps (minimal cost, Beginner): A simple roll of brown paper from a craft store yields wrapping for fifty gifts at roughly three dollars total. Customize with potato stamps, eraser carvings, or found objects dipped in paint. The handmade imperfection reads as charming rather than amateur.
Old maps (free if recycled, Beginner): Maps make ideal wrapping for travel lovers, geography teachers, or anyone with wanderlust. Position the paper so a meaningful location faces outward—the recipient's birthplace, honeymoon destination, or dream travel spot.
Sheet music (free if recycled, Beginner): Music teachers, performers, and enthusiasts appreciate gifts wrapped in vintage sheet music. Search thrift stores or use printable vintage music PDFs for endless supply. The warm cream paper and musical notation create instant visual interest.
Fabric furoshiki Japanese technique (free with existing fabric, Intermediate): Traditional Japanese wrapping uses square fabric cloths tied in specific patterns. Place your gift diagonally in the center of the fabric, bring two opposite corners to the center and tie, then bring the remaining corners up and tie them in a handle knot. The fabric becomes part of the gift—recipients can reuse it for their own wrapping or as a scarf, bandana, or napkin.
Children's artwork (free, Beginner): That stack of drawings on your refrigerator becomes meaningful wrapping paper for grandparents and relatives. Grandchildren's artwork wrapped around birthday gifts adds layers of emotional value that no store-bought paper can match.
Plain butcher paper with children's handprints (minimal cost, Beginner): Dip small hands in washable paint and press onto white or brown butcher paper. Once dried, this personalized paper wraps gifts for any family member with connection to those children.
Old calendars (free, Beginner): Large calendar pages featuring nature photography, artwork, or inspirational images work beautifully as wrapping paper. Match the image to the recipient's interests—garden scenes for the gardener, mountain vistas for the hiker.
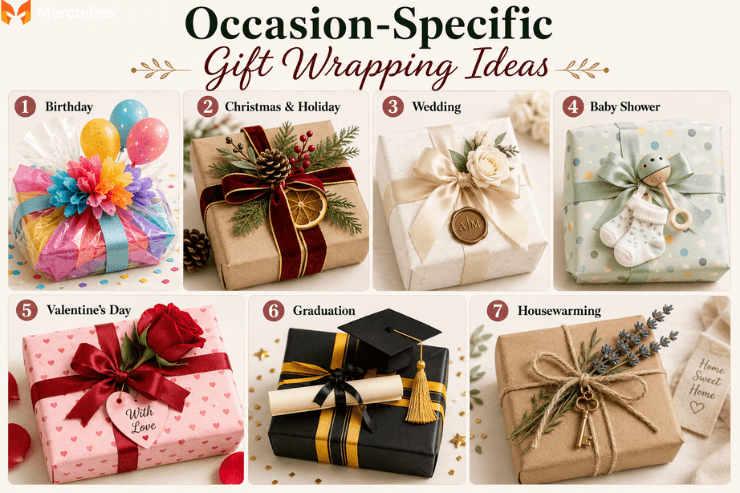
Occasion-Specific Gift Wrapping Ideas
The recipient's reason for receiving the gift should guide your wrapping choices as much as the gift itself. Matching your presentation to the occasion demonstrates thoughtfulness beyond simply selecting an appropriate present.
Occasion-Specific Gift Wrapping Ideas
Birthday wrapping: Balloons as gift toppers, either real mini balloons or balloon-shaped cutouts, signal celebration immediately. Layer brightly colored tissue paper visible through a clear cellophane overwrap for festive depth. Pom-pom bows in multiple colors read more joyful than single-color elegance.
Holiday and Christmas wrapping: Natural greenery tucked under ribbons—pine sprigs, eucalyptus branches, dried orange slices—connects presents to seasonal décor. Kraft paper with gold ribbon creates rustic elegance. Velvet ribbons in burgundy or forest green signal winter luxury. Pinecones attached with hot glue become dimensional toppers that recipients often save.
Wedding gift wrapping: White or ivory paper serves as the foundation, but pure white can feel clinical. Add warmth through cream ribbons, subtle metallic accents in gold or rose gold, or a single silk flower. Wax seals imprinted with initials elevate a simple wrap to keepsake status. For complete step-by-step techniques, see our guide on how to wrap a gift like a pro.
Baby shower wrapping: Soft pastels remain classic, but modern baby showers embrace bolder patterns and gender-neutral palettes of mint, yellow, and gray. Rattle toppers, pacifier charms, or tiny socks threaded onto ribbon add dimensional interest that delights expectant parents.
Valentine's Day wrapping: Red paper feels expected, so consider pink paper with red accents or white paper with red ribbon for subtle romance. Heart-shaped gift tags cut from card stock take seconds to create. A single real rose stem tucked under the ribbon creates a presentation that outshines elaborate techniques.
Graduation gift wrapping: School colors in paper and ribbon combinations honor the achievement directly. Roll cash or checks into diploma shapes tied with thin ribbon for money gifts. Mortarboard bow toppers using black paper and a small tassel continue the theme.
Housewarming gift wrapping: A tiny key charm attached to the ribbon symbolizes the new home milestone. Natural tones—kraft paper, twine, dried lavender—suit home goods without clashing with any décor style the recipient might have.
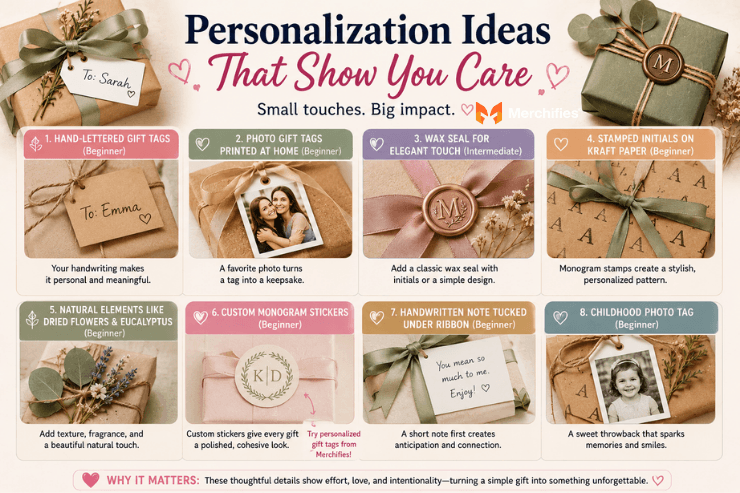
Personalization Ideas That Show You Care
Personalized touches transform wrapping from functional necessity to communication of care. These additions require minimal extra time but significantly increase the emotional impact of your gift presentation.
Personalization Ideas That Show You Care
Hand-lettered gift tags (Beginner): Simple cardstock tags with the recipient's name in your handwriting outperform elaborate printed tags. Even imperfect lettering reads as personal effort. Practice the name once on scrap paper before committing to your final tag.
Photo gift tags printed at home (Beginner): Print a favorite photo of yourself with the recipient, or of them at a memorable moment, scaled to gift tag size. Punch a hole, thread with ribbon, and attach. The photo often gets kept long after the gift is forgotten.
Wax seal for elegant touch (Intermediate): Wax seal kits cost under fifteen dollars and create impressions that look custom-ordered. Use the recipient's initial or a simple design that matches the occasion. Apply the seal directly to ribbon or to a folded flap of paper.
Stamped initials on kraft paper (Beginner): Large alphabet stamps pressed into kraft paper create a repeating monogram pattern personalized to the recipient. Use ink colors that complement your ribbon for cohesive presentation.
Natural elements like dried flowers and eucalyptus (Beginner): Dried lavender, eucalyptus stems, baby's breath, or small succulent cuttings tucked under ribbon add organic texture and often light fragrance. These elements particularly suit recipients who appreciate gardening, natural aesthetics, or sustainability.
Custom monogram stickers (Beginner): Many office supply stores print custom stickers same-day. A sheet of monogram stickers in the recipient's initials finishes multiple gifts with a consistent, polished look. Personalized gift tags from Merchifies add a professional custom touch for those wanting polished results without hand-lettering—ideal when you are wrapping multiple presents for the same recipient or event.
Handwritten note tucked under ribbon (Beginner): A folded note placed between the ribbon and the wrapped gift invites reading before unwrapping. This creates a sequence—first the message, then the reveal—that builds anticipation. The note need not be long; even a single meaningful sentence works.
Childhood photo tag: For gifts to parents, grandparents, or long-time friends, attach a small childhood photo of yourself as the gift tag. The unexpected throwback sparks conversation and emotional connection before the gift is even opened.
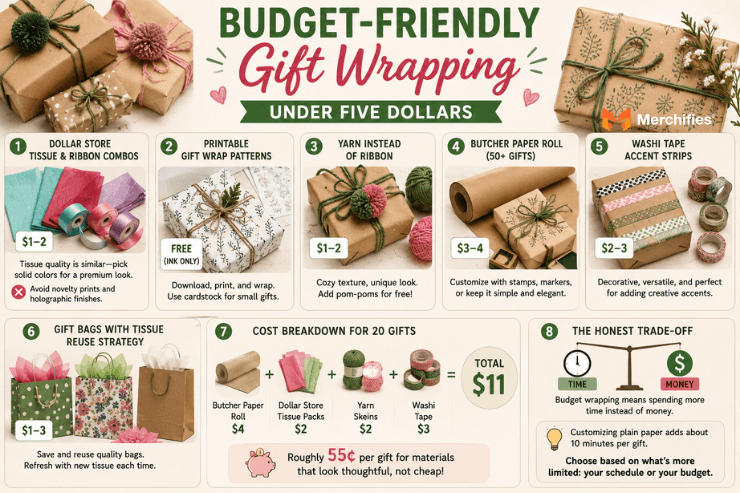
Budget-Friendly Gift Wrapping Under Five Dollars
Dollar stores and discount retailers stock supplies that create premium presentation for a fraction of typical costs. The key is knowing which inexpensive items photograph well and which read as cheap.
Budget-Friendly Gift Wrapping Under Five Dollars
Dollar store tissue and ribbon combos ($1-2): Tissue paper quality varies little between dollar stores and craft stores—the material tears the same either way. Dollar store ribbons in solid colors look identical to expensive alternatives. Avoid: novelty prints that date quickly and holographic finishes that crinkle poorly.
Printable gift wrap patterns (free): Numerous websites offer downloadable PDF patterns designed for home printing on standard paper. Print on heavier cardstock for small gifts, or piece multiple pages together for larger items. Cost: ink only.
Yarn instead of ribbon ($1-2): Chunky yarn wrapped around packages creates cozy texture distinct from ribbon. Multiple yarn colors twisted together before wrapping add dimension. Pom-poms made from yarn cost essentially nothing and look festive.
Butcher paper roll ($3-4 for fifty plus gifts): A single roll of white or brown butcher paper from a craft store wraps dozens of gifts. Customize with stamps, markers, children's drawings, or leave plain with quality ribbon. Cost per gift: approximately seven cents for paper.
Washi tape accent strips ($2-3): These decorative Japanese tapes come in hundreds of patterns. Use strips across plain paper as decorative bands, create geometric patterns, or seal folds without traditional tape. Many dollar stores now carry basic washi tape varieties.
Gift bags with tissue reuse strategy ($1-3): Quality gift bags survive multiple uses. Start a collection by smoothing and storing bags you receive, then rotate them through gift-giving occasions. Refresh with new tissue paper each time.
Cost breakdown for twenty gifts: Butcher paper roll ($4) plus dollar store tissue packs ($2) plus yarn skeins ($2) plus washi tape ($3) equals eleven dollars total—roughly fifty-five cents per gift for materials that look thoughtful rather than cheap.
The honest trade-off with budget wrapping: you spend time instead of money. Customizing plain paper with stamps or drawings adds ten minutes per gift compared to unrolling pre-printed paper. Decide based on whether your schedule or your budget feels more constrained.
-da0801079a650a2e.jpeg)
-d4c38c342cdf20ca.jpeg)


-b555fcc6b204c456.jpeg)


